Ford Explorer: Climate Control System - General Information / Removal and Installation - Cabin Heater Coolant Pump - 2.3L EcoBoost (201kW/273PS)
Ford Explorer 2020-2025 Service Manual / Electrical / Climate Control System / Climate Control System - General Information / Removal and Installation - Cabin Heater Coolant Pump - 2.3L EcoBoost (201kW/273PS)
Special Tool(s) / General Equipment
| Hose Clamp(s) | |
| Hose Clamp Remover/Installer | |
| Fluid Container |
Removal
NOTE: Removal steps in this procedure may contain installation details.
-
Release the cooling system pressure by slowly turning the pressure relief cap between 2 and 3 turns and remove the pressure relief cap..jpg) WARNING:
Always allow the engine to cool before opening the
cooling system. Do not unscrew the coolant pressure relief cap when the
engine is operating or the cooling system is hot. The cooling system is
under pressure; steam and hot liquid can come out forcefully when the
cap is loosened slightly. Failure to follow these instructions may
result in serious personal injury.
WARNING:
Always allow the engine to cool before opening the
cooling system. Do not unscrew the coolant pressure relief cap when the
engine is operating or the cooling system is hot. The cooling system is
under pressure; steam and hot liquid can come out forcefully when the
cap is loosened slightly. Failure to follow these instructions may
result in serious personal injury.
.jpg) |
-
Remove the engine rear undershield.
Refer to: Engine Rear Undershield (501-02 Front End Body Panels, Removal and Installation).
-
Disconnect the electrical connector.
.jpg) |
-
NOTE: Be prepared to collect escaping fluid.
-
Clamp the coolant hoses, release and disconnect the inlet and outlet coolant hoses.
Use the General Equipment: Fluid Container
Use the General Equipment: Hose Clamp(s)
Use the General Equipment: Hose Clamp Remover/Installer
-
Remove the retainers and the cabin heater coolant pump.
Torque: 177 lb.in (20 Nm)
-
Clamp the coolant hoses, release and disconnect the inlet and outlet coolant hoses.
.jpg) |
Installation
-
To install, reverse the removal procedure.
-
Fill and bleed the cooling system.
Refer to: Engine Cooling System Draining, Vacuum Filling and Bleeding (303-03A Engine Cooling - 2.3L EcoBoost (201kW/273PS), General Procedures).
 Removal and Installation - Cabin Air Filter
Removal
Push the stop tabs inwards and fully lower the glove compartment.
Remove the glove compartment check strap.
Remove the screws and lower th..
 Removal and Installation - Center Registers
Special Tool(s) /
General Equipment
Interior Trim Remover
Removal
NOTE:
Removal steps in this procedure may contain installation details...
Other information:
Ford Explorer 2020-2025 Service Manual: Removal and Installation - Transmission Fluid Auxiliary Pump
Removal NOTE: It is not necessary to remove the transmission fluid filter to remove the transmission fluid auxiliary pump. Remove the transmission fluid pan and gasket. Refer to: Transmission Fluid Pan, Gasket and Filter (307-01A Automatic Transmission - 10-Speed Automatic Transmission – 10R60, Removal and Installation)...
Ford Explorer 2020-2025 Service Manual: Removal and Installation - Manifold Absolute Pressure and Temperature (MAPT) Sensor
Materials Name Specification Motorcraft® Silicone Brake Caliper Grease and Dielectric CompoundXG-3-A ESE-M1C171-A Removal NOTE: Removal steps in this procedure may contain installation details. NOTICE: Do not pull the engine appearance cover forward or sideways to remove...
Categories
- Manuals Home
- 6th Generation Explorer Owners Manual
- 6th Generation Explorer Service Manual
- Engine - 2.3L EcoBoost (201kW/273PS)
- Removal and Installation - Front Halfshaft Speed Sensor
- Removal and Installation - Liftgate Trim Panel
- New on site
- Most important about car
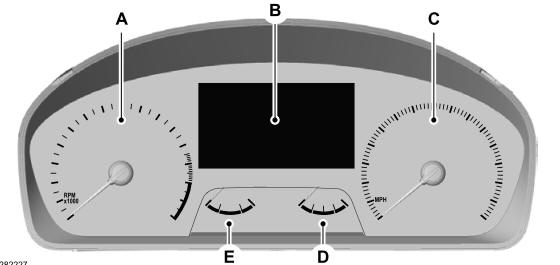
Gauges
4 Inch Display

A - Tachometer.
B - Information display.
C - Speedometer.
D - Fuel gauge.
E - Engine coolant temperature gauge.
Copyright © 2025 www.foexplorer.com
