Ford Explorer: Interior Trim and Ornamentation / Removal and Installation - Liftgate Trim Panel
Ford Explorer 2020-2026 Service Manual / Body and Paint / Body and Paint / Interior Trim and Ornamentation / Removal and Installation - Liftgate Trim Panel
Special Tool(s) / General Equipment
| Interior Trim Remover |
Removal
-
Release the clips and remove the liftgate center upper trim panel.
Use the General Equipment: Interior Trim Remover
.jpg) |
-
Release the clips in the order shown from the inside edge and remove the liftgate RH upper trim panel.
Use the General Equipment: Interior Trim Remover
.jpg) |
-
Release the clips in the order shown from the inside edge and remove the liftgate LH upper trim panel.
Use the General Equipment: Interior Trim Remover
.jpg) |
-
Remove the liftgate lower trim panel.
-
Release the upper clips.
Use the General Equipment: Interior Trim Remover
-
Release the middle clips.
Use the General Equipment: Interior Trim Remover
-
Release the lower clips.
Use the General Equipment: Interior Trim Remover
-
If equipped.
Disconnect the liftgate door lock control switch electrical connector.
-
Release the upper clips.
.jpg) |
Installation
-
NOTE: Transfer parts as necessary.
To install, reverse the removal procedure.
 Removal and Installation - Headliner - Lowering
Special Tool(s) /
General Equipment
Pick Hook
Interior Trim Remover
Remove the following items:
On both sides.
Remove the A-pillar trim panel...
 Removal and Installation - Loadspace Trim Panel
Special Tool(s) /
General Equipment
Long Nose Pliers
Interior Trim Remover
Removal
NOTE:
LH (left hand) shown, RH (right hand) similar...
Other information:
Ford Explorer 2020-2026 Service Manual: Description and Operation - Direct Current/Direct Current (DC/DC) Converter Control Module - System Operation and Component Description
System Operation System Diagram - DCDC Item Description 1 Ignition Switch 2 PCM 3 SOBDMC 4 BCM 5 BECM 6 DCDC 7 High Voltage/Low Current Fuse 8 12V Battery Monitoring Sensor Network Message Chart DCDC Network Input Messages Broadcast Message Originat..
Ford Explorer 2020-2026 Service Manual: Description and Operation - Front Seats - Overview
Overview Driver Power Seat - Without Memory The 6-way driver power seat is equipped with the following motors: Front height motor (serviced with front seat track) Rear height motor (serviced with front seat track) Horizontal motor (serviced with front seat track) The 8-way driver power seat is equipped with the following motors: Front height motor (serviced with front ..
Categories
- Manuals Home
- 6th Generation Explorer Owners Manual
- 6th Generation Explorer Service Manual
- Automatic Transmission
- Description and Operation - Jacking and Lifting - Overview
- General Procedures - Transmission Fluid Drain and Refill
- New on site
- Most important about car
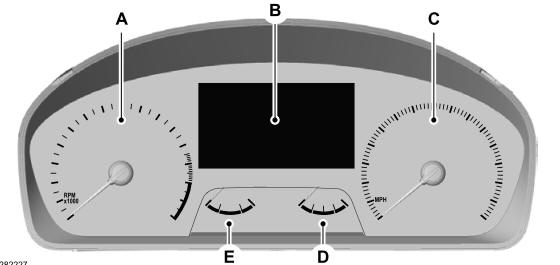
Gauges
4 Inch Display

A - Tachometer.
B - Information display.
C - Speedometer.
D - Fuel gauge.
E - Engine coolant temperature gauge.
Copyright © 2026 www.foexplorer.com
