Ford Explorer: Front Drive Axle/Differential / Removal and Installation - Front Halfshaft Speed Sensor
Materials
| Name | Specification |
|---|---|
| Motorcraft® SAE 75W-140 Synthetic Rear Axle Lubricant XY-75W140-QL |
WSL-M2C192-A |
Removal
-
With the vehicle in NEUTRAL, position it on a hoist.
Refer to: Jacking and Lifting - Overview (100-02 Jacking and Lifting, Description and Operation).
-
-
Remove the pin-type retainer.
-
Remove the bolts and the radiator air deflector.
-
Remove the bolts.
-
Remove the retainers and the engine undershield.
-
Remove the pin-type retainer.
.jpg) |
-
Disconnect the front halfshaft speed sensor electrical connector.
.jpg) |
-
Remove the bolt and the front halfshaft speed sensor.
.jpg) |
-
NOTE: The O-ring seals are to be reused unless damaged.
Clean and inspect the front halfshaft speed sensor O-ring for damage and install new front halfshaft speed sensor as necessary.
.jpg) |
Installation
-
NOTE: Make sure that the mating surface and the bore is free of corrosion and foreign material, avoid particles getting into the bore.
Clean and inspect the front axle assembly at front halfshaft speed sensor mating surface.
.jpg) |
-
NOTE: Make sure that a new component is installed if the O-ring is damaged.
NOTE: Make sure the O-ring is installed correctly within the O-ring groove.
If removed, install the new front halfshaft speed sensor O-ring and lubricate them with clean front axle fluid.
Material: Motorcraft® SAE 75W-140 Synthetic Rear Axle Lubricant / XY-75W140-QL (WSL-M2C192-A)
.jpg) |
-
NOTE: The shim is to be reused with a new speed sensor unless damaged (if equipped).
Install the front halfshaft speed sensor and the bolt.
Torque: 89 lb.in (10 Nm)
|
-
Connect the front halfshaft speed sensor electrical connector.
|
-
Check the front differential fluid level.
Refer to: Differential Fluid Level Check (205-03 Front Drive Axle/Differential, General Procedures).
-
-
Position the engine undershield and install the pin-type retainer.
-
Install the bolts.
Torque: 22 lb.in (2.5 Nm)
-
Install the radiator air deflector and the bolts.
Torque: 22 lb.in (2.5 Nm)
-
Install the radiator air deflector retainers.
-
Position the engine undershield and install the pin-type retainer.
|
 Removal and Installation - Drive Pinion Seal
Special Tool(s) /
General Equipment
205-1065Installer, Pinion Seal
205-199
(T83T-3132-A1)
Installer, Spindle/Axle ShaftT83-4000-ATKIT-1983-FTKIT-1983-FLMTKIT-1983-FX
Flat Headed S..

Other information:
Ford Explorer 2020-2026 Service Manual: Diagnosis and Testing - Turn Signal and Hazard Lamps
Diagnostic Trouble Code (DTC) Chart Diagnostics in this manual assume a certain skill level and knowledge of Ford-specific diagnostic practices. REFER to: Diagnostic Methods (100-00 General Information, Description and Operation). Diagnostic Trouble Code Chart Module DTC Description Action BCM B123A:1..
Ford Explorer 2020-2026 Owners Manual: Proper Driver and Front Passenger Seating Adjustment
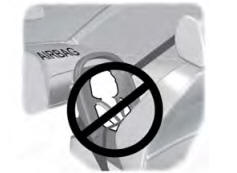
WARNING: National Highway Traffic Safety Administration (NHTSA) recommends a minimum distance of at least 10 in (25 cm) between an occupant's chest and the driver airbag module. To properly position yourself away from the airbag: Move your seat to the rear as far as you can while still reaching the pedals comfortably...
Categories
- Manuals Home
- 6th Generation Explorer Owners Manual
- 6th Generation Explorer Service Manual
- Body and Paint
- Engine - 2.3L EcoBoost (201kW/273PS)
- Body and Paint
- New on site
- Most important about car
Children and Airbags
WARNING: Airbags can kill or injure a child in a child restraint. Never place a rear-facing child restraint in front of an active airbag. If you must use a forward-facing child restraint in the front seat, move the seat upon which the child restraint is installed all the way back.