Ford Explorer: High Voltage Battery, Mounting and Cables / General Procedures - High Voltage Battery Charging - Hybrid Electric Vehicle (HEV)
Charging
.jpg) WARNING:
To prevent the risk of high-voltage shock, always follow
precisely all warnings and service instructions, including instructions
to depower the system. The high-voltage system utilizes approximately
300 volts DC, provided through high-voltage cables to its components and
modules. The high-voltage cables and wiring are identified by orange
harness tape or orange wire covering. All high-voltage components are
marked with high-voltage warning labels with a high-voltage symbol.
Failure to follow these instructions may result in serious personal
injury or death.
WARNING:
To prevent the risk of high-voltage shock, always follow
precisely all warnings and service instructions, including instructions
to depower the system. The high-voltage system utilizes approximately
300 volts DC, provided through high-voltage cables to its components and
modules. The high-voltage cables and wiring are identified by orange
harness tape or orange wire covering. All high-voltage components are
marked with high-voltage warning labels with a high-voltage symbol.
Failure to follow these instructions may result in serious personal
injury or death.
NOTICE: Follow the detailed instructions included with the Ford approved high voltage battery charger.
NOTE: Check OASIS for any applicable service information before beginning the charging process.
-
Depower the high voltage battery.
Refer to: High Voltage System De-energizing (414-03 High Voltage Battery, Mounting and Cables, General Procedures).
-
Raise the vehicle on a hoist.
Refer to: Jacking and Lifting (100-02) .
-
If necessary, remove the components to access the high voltage battery electrical connectors.
Refer to: High Voltage Battery - Hybrid Electric Vehicle (HEV) (414-03 High Voltage Battery, Mounting and Cables, Removal and Installation).
-
Disconnect high voltage battery low voltage connector C4238.
-
Connect the black interface cable from high voltage battery charger to the high voltage battery.
-
Disconnect the high voltage battery high voltage connector C4236D.
-
Connect the orange high voltage interface cable from the high voltage charger to the high voltage battery.
-
Turn on the high voltage battery charger. Follow the operating instructions provided with the charger.
-
The high voltage battery charger displays the results when charging is completed.
-
Turn off the high voltage battery charger following the instructions included.
-
Disconnect the high voltage battery charger from the high voltage battery.
-
Connect the vehicle high voltage and low voltage high voltage battery connectors C4238 and C4236D.
-
If necessary, install the components previously removed
to access the high voltage battery electrical connectors.
Refer to: High Voltage Battery - Hybrid Electric Vehicle (HEV) (414-03 High Voltage Battery, Mounting and Cables, Removal and Installation).
-
Repower the high voltage battery.
Refer to: High Voltage System De-energizing (414-03 High Voltage Battery, Mounting and Cables, General Procedures).
 Diagnosis and Testing - High Voltage Battery, Mounting and Cables
Diagnostic Trouble Code (DTC) Chart
Diagnostics in this manual assume a certain skill level and knowledge of Ford-specific diagnostic practices. REFER to: Diagnostic Methods (100-00 General Informati..
 General Procedures - High Voltage System De-energizing
Depower
WARNING:
To prevent the risk of high-voltage shock, always follow
precisely all warnings and service instructions, including instructions
to depower the system...
Other information:
Ford Explorer 2020-2025 Service Manual: General Procedures - Washer Hose Coupling
Disconnect WARNING: Before beginning any service procedure in this section, refer to Safety Warnings in section 100-00 General Information. Failure to follow this instruction may result in serious personal injury. Refer to: Health and Safety Precautions (100-00 General Information, Description and Operation)...
Ford Explorer 2020-2025 Service Manual: Removal and Installation - Front Seat Cushion Cover
Removal Passenger seat Remove the OCS. Refer to: Occupant Classification System (OCS) Sensor - Vehicles Without: Multi-Contour Seats (501-20B Supplemental Restraint System, Removal and Installation). Refer to: Occupant Classification System (OCS) Sensor - Vehicles With: Multi-Contour Seats (501-20B Supplemental Restraint System, Removal and Installation)...
Categories
- Manuals Home
- 6th Generation Explorer Owners Manual
- 6th Generation Explorer Service Manual
- General Procedures - Transmission Fluid Drain and Refill
- Interior Trim and Ornamentation
- Diagnosis and Testing - Parking Brake - Vehicles With: Electric Brake Booster
- New on site
- Most important about car
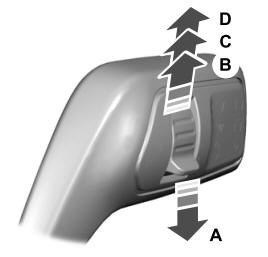
Windshield Wipers
 Push the lever up or down to operate
the windshield wipers.

A - Single wipe.
