Ford Explorer: Front Seats / Removal and Installation - Front Seat Cushion Cover
Removal
Passenger seat
-
Remove the OCS.
Refer to: Occupant Classification System (OCS) Sensor - Vehicles Without: Multi-Contour Seats (501-20B Supplemental Restraint System, Removal and Installation).
Refer to: Occupant Classification System (OCS) Sensor - Vehicles With: Multi-Contour Seats (501-20B Supplemental Restraint System, Removal and Installation).
Driver seat
-
Remove the front seat.
Refer to: Front Seat (501-10A Front Seats, Removal and Installation).
-
If equipped with manual recline.
Remove the front seat recline handle cover.
-
Lift the recline handle.
-
Remove the screw.
-
Remove the recline handle cover.
-
Lift the recline handle.
.jpg) |
-
Remove the side shield screw.
.jpg) |
-
-
Lift up and out, separating the side shield from the recliner bracket.
-
Slide the side shield forward and separate the side shield from the seat.
-
Lift up and out, separating the side shield from the recliner bracket.
.jpg) |
-
Disconnect the front seat control switch electrical connector and remove the side shield.
.jpg) |
-
Remove the screws and the front seat valance.
.jpg) |
-
Release the front seat backrest panel straps.
-
If equipped with heated seat.
Detach the retainer and position the wiring harness aside.
-
Release the backrest panel straps.
-
If equipped with heated seat.
.jpg) |
-
Detach the front seat electrical connectors and
wiring harness retainers and position the wiring harnesses aside.
.jpg) |
-
Detach the front seat cushion cover rear J-clips and position the cushion cover aside.
.jpg) |
-
If equipped with heated seat.
Disconnect the front seat cushion heater mat electrical connector.
.jpg) |
-
Remove the front seat cushion cover and foam as an assembly.
-
Detach the cushion cover J-clip.
-
On both sides.
Detach the cushion cover J-clips.
-
Detach the cushion cover J-clip.
.jpg) |
All seats
-
NOTE: This step is only necessary when installing a new component.
Position the rear portion of the seat cushion cover from the foam.
.jpg) |
-
NOTE: This step is only necessary when installing a new component.
NOTE: Base seat shown, all others similar.
Remove the seat cushion cover.
-
Invert the seat cushion cover.
-
NOTICE: Use care when separating the seat cushion trim cover from the hook-and-loop strips or the hook-and-loop strips may be torn from the seat cushion foam pad.
Release hook-and-loop strips.
-
NOTICE: Use care when separating the seat cushion from the hook-and-arrow or the hook may be torn from the seat cushion foam pad.
Release the hook and arrows.
-
Invert the seat cushion cover.
.jpg) |
Installation
-
To install, reverse the removal procedure.
 Removal and Installation - Front Seat Cushion Blower Motor
Removal
Raise the front seat to its highest point of travel.
Remove the front seat cushion blower motor.
Disconnect the electrical connector...
 Removal and Installation - Front Seat Power Lumbar Assembly - Vehicles Without: Multi-Contour Seats
Special Tool(s) /
General Equipment
Interior Trim Remover
Removal
NOTE:
Driver seat shown, passenger seat similar.
Remove the front seat...
Other information:
Ford Explorer 2020-2026 Service Manual: Removal and Installation - Light Emitting Diode (LED) Control Module
Removal NOTE: Removal steps in this procedure may contain installation details. Remove the headlamp assembly. Refer to: Headlamp Assembly (417-01 Exterior Lighting, Removal and Installation). Remove the bolts and position the LED control module...
Ford Explorer 2020-2026 Service Manual: Specifications
2.3L EcoBoost (201kW/273PS) Item Specification Fuel Pressure 58.0 –75.4 psi ( 400 –520 kPa) Fuel Tank Capacity 17.90 gal ( 67...
Categories
- Manuals Home
- 6th Generation Explorer Owners Manual
- 6th Generation Explorer Service Manual
- Automatic Transmission - 10-Speed Automatic Transmission – 10R60
- General Procedures - Brake Service Mode Activation and Deactivation
- Auxiliary Power Points
- New on site
- Most important about car
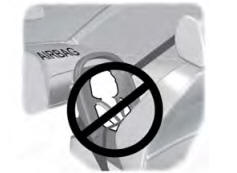
Children and Airbags
WARNING: Airbags can kill or injure a child in a child restraint. Never place a rear-facing child restraint in front of an active airbag. If you must use a forward-facing child restraint in the front seat, move the seat upon which the child restraint is installed all the way back.