Ford Explorer: Wipers and Washers / Removal and Installation - Windshield Washer Reservoir
Ford Explorer 2020-2026 Service Manual / Body and Paint / Body and Paint / Wipers and Washers / Removal and Installation - Windshield Washer Reservoir
Special Tool(s) / General Equipment
| Fluid Suction Gun | |
| Fluid Container |
Materials
| Name | Specification |
|---|---|
| Motorcraft® Premium Windshield Wash Concentrate with Bitterant ZC-32-B2 |
WSS-M14P19-A |
Removal
NOTE: Removal steps in this procedure may contain installation details.
-
Siphon the windshield washer fluid out.
-
Open the windshield washer fluid reservoir cap.
-
Siphon the windshield washer fluid.
Use the General Equipment: Fluid Suction Gun
Use the General Equipment: Fluid Container
-
Open the windshield washer fluid reservoir cap.
.jpg) |
-
Remove the retainers and position aside the cowl side fill trim.
.jpg) |
-
Remove the windshield washer fluid reservoir fill neck.
-
If equipped.
Remove the windshield washer fluid reservoir fill neck retainer.
-
If equipped.
Remove the windshield washer fluid reservoir fill neck retainer.
-
Remove the windshield washer fluid reservoir fill neck.
-
If equipped.
.jpg) |
-
Remove the RH fender splash shield.
Refer to: Fender Splash Shield (501-02 Front End Body Panels, Removal and Installation).
-
Disconnect the electrical connectors.
-
Disconnect the windshield washer fluid reservoir electrical connector.
-
NOTE: Be prepared to collect escaping fluid.
Detach the washer hoses.
Use the General Equipment: Fluid Container
-
Disconnect the windshield washer fluid reservoir electrical connector.
.jpg) |
-
-
NOTE: Note the position of the component before removal.
Remove the windshield washer fluid reservoir nut.
Torque: 80 lb.in (9 Nm)
-
Remove the windshield washer fluid reservoir bolt.
Torque: 80 lb.in (9 Nm)
-
Remove the windshield washer fluid reservoir.
-
.jpg) |
-
NOTE: This step is only necessary when installing a new component.
-
Disconnect the windshield washer fluid level sensor electrical connector.
-
Remove the windshield washer fluid level sensor.
-
Disconnect the windshield washer fluid level sensor electrical connector.
.jpg) |
-
NOTE: This step is only necessary when installing a new component.
-
Disconnect the windshield washer pump electrical connector.
-
Disconnect the windshield washer pump fluid hoses.
-
Remove the windshield washer pump.
-
Disconnect the windshield washer pump electrical connector.
.jpg) |
Installation
-
NOTICE: Do not operate the washer pump prior to filling the windshield washer reservoir. Failure to follow this instruction may result in premature pump failure.
To install, reverse the removal procedure. Material: Motorcraft® Premium Windshield Wash Concentrate with Bitterant / ZC-32-B2 (WSS-M14P19-A)
 Removal and Installation - Windshield Washer Pump
Materials
Name
Specification
Motorcraft® Premium Windshield Wash Concentrate with BitterantZC-32-B2
WSS-M14P19-A
Removal
Remove the windshield washer reservoir...
 Removal and Installation - Windshield Wiper Motor
Removal
NOTE:
Removal steps in this procedure may contain installation details.
Remove the wiper linkage assembly.
Refer to: Wiper Linkage Assembly (501-16 Wipers and Washers, Removal a..
Other information:
Ford Explorer 2020-2026 Service Manual: Description and Operation - Third Row Seats - System Operation and Component Description
System Operation System Diagram Item Description 1 SCMJ 2 HS-CAN1 3 PCM 4 Liftgate Ajar Switch 5 Power Fold Seat Control Switch 6 Power Folding Seat Motors 7 Hall-Effect Sensors 8 Motors 9 MS-CAN 10 GWM 11 BCM Network Message Chart SCMJ Network Input Messag..
Ford Explorer 2020-2026 Service Manual: Description and Operation - Important Safety Instructions
COLLISION, DAMAGE OR FIRE EVENT WARNING: Service of this electric vehicle is restricted to qualified personnel. The required qualifications vary by region. Always observe local laws and legislative directives regarding electric vehicle service...
Categories
- Manuals Home
- 6th Generation Explorer Owners Manual
- 6th Generation Explorer Service Manual
- General Procedures - Transmission Fluid Drain and Refill
- Automatic Transmission - 10-Speed Automatic Transmission – 10R60
- General Procedures - Brake Service Mode Activation and Deactivation
- New on site
- Most important about car
Locking and Unlocking
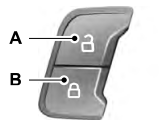
You can use the power door lock control or the remote control to lock and unlock your vehicle.
Power Door Locks
The power door lock control is on the driver and front passenger door panels.

Copyright © 2026 www.foexplorer.com
