Ford Explorer: Driveshaft / Disassembly and Assembly - Driveshaft Alignment Bushing
Special Tool(s) / General Equipment
| Three Leg Puller | |
| Punch | |
| Copper Hammer | |
| Vise |
Materials
| Name | Specification |
|---|---|
| Motorcraft® Premium Long-Life Grease XG-1-E1 |
ESA-M1C75-B |
DISASSEMBLY
-
Remove the rear driveshaft.
Refer to: Rear Driveshaft (205-01 Driveshaft, Removal and Installation).
-
Remove the driveshaft flexible coupling.
Refer to: Driveshaft Flexible Coupling (205-01 Driveshaft, Removal and Installation).
-
Using the general equipments, remove and discard the driveshaft alignment bushing.
Use the General Equipment: Vise
Use the General Equipment: Copper Hammer
Use the General Equipment: Punch
.jpg) |
ASSEMBLY
-
NOTICE: Do not over-lubricate the driveshaft components. Using excessive grease may damage the driveshaft components.
NOTE: Wipe off any excess grease.
Clean and lubricate the driveshaft flange at alignment bushing mating surface.
Use the General Equipment: Vise
Material: Motorcraft® Premium Long-Life Grease / XG-1-E1 (ESA-M1C75-B)
.jpg) |
-
NOTE: Make sure that new components are installed.
NOTE: Make sure that the rubber seal end of the bushing is facing outward.
NOTE: Press the component by hand initially.
Position the driveshaft alignment bushing into the driveshaft.
.jpg) |
-
Using the general equipments, press-in the new
driveshaft alignment bushing until it has bottomed out inside of the
driveshaft flange.
Use the General Equipment: Vise
Use the General Equipment: Three Leg Puller
.jpg) |
-
Ensure the final press in height of the new driveshaft alignment bushing should be 16 mm as shown.
.jpg) |
-
NOTICE: Do not over-lubricate the driveshaft components. Using excessive grease may damage the driveshaft components.
NOTE: Wipe off any excess grease.
Lubricate the driveshaft alignment bushing cavity with grease before installing the driveshaft.
Material: Motorcraft® Premium Long-Life Grease / XG-1-E1 (ESA-M1C75-B)
.jpg) |
-
Install the driveshaft flexible coupling.
Refer to: Driveshaft Flexible Coupling (205-01 Driveshaft, Removal and Installation).
-
Install the rear driveshaft.
Refer to: Rear Driveshaft (205-01 Driveshaft, Removal and Installation).
 Removal and Installation - Rear Driveshaft Slip Yoke Boot
Special Tool(s) /
General Equipment
Crimping Tool
Materials
Name
Specification
Motorcraft® Premium Long-Life GreaseXG-1-E1
ESA-M1C75-B
Removal
Remove the rea..
 Disassembly and Assembly - Driveshaft Center Bearing
Special Tool(s) /
General Equipment
Hydraulic Press
Bearing Separator
Materials
Name
Specification
Motorcraft® Premium Long-Life GreaseXG-1-E1
ESA-M1C75-B
DISASS..
Other information:
Ford Explorer 2020-2026 Service Manual: Diagnosis and Testing - Horn
Diagnostic Trouble Code (DTC) Chart Diagnostics in this manual assume a certain skill level and knowledge of Ford-specific diagnostic practices. REFER to: Diagnostic Methods (100-00 General Information, Description and Operation). Diagnostic Trouble Code Chart Module DTC Description Action BCM B1323:1..
Ford Explorer 2020-2026 Service Manual: Removal and Installation - Timing Chain Tensioner
Removal NOTICE: Do not loosen or remove the crankshaft pulley bolt without first installing the special tools as instructed in this procedure. The crankshaft pulley and the crankshaft timing sprocket are not keyed to the crankshaft. The crankshaft, the crankshaft sprocket and the pulley are fitted together by friction...
Categories
- Manuals Home
- 6th Generation Explorer Owners Manual
- 6th Generation Explorer Service Manual
- Description and Operation - Identification Codes
- Electric Parking Brake
- Body and Paint
- New on site
- Most important about car
Locking and Unlocking
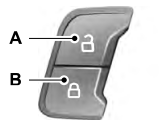
You can use the power door lock control or the remote control to lock and unlock your vehicle.
Power Door Locks
The power door lock control is on the driver and front passenger door panels.

