Ford Explorer: Supplemental Climate Control / Removal and Installation - High Voltage Battery Coolant Cooler
Ford Explorer 2020-2025 Service Manual / Electrical / Climate Control System / Supplemental Climate Control / Removal and Installation - High Voltage Battery Coolant Cooler
Special Tool(s) / General Equipment
| Hose Clamp(s) | |
| Hose Clamp Remover/Installer |
Removal
NOTICE: During the removal of components, cap, tape or otherwise appropriately protect all openings to prevent the ingress of dirt or other contamination. Remove protective materials prior to installation.
aviator game app download indiaNOTE: Removal steps in this procedure may contain installation details.
-
Recover the refrigerant. Refer to the appropriate Recovery procedure in Group 412.
-
Drain the electric powertrain cooling system.
Refer to: Cooling System Filling and Bleeding (303-03E Electric Powertrain Cooling - 3.3L Duratec-V6 – Hybrid (BP), General Procedures).
-
-
Disconnect the electrical connector.
-
Remove the retainer and position aside the manifold assembly
Torque: 159 lb.in (18 Nm)
-
Remove the mounting retainers.
Torque: 80 lb.in (9 Nm)
-
Make sure to cover any open ports to prevent debris from entering the system.
-
Disconnect the electrical connector.
.jpg) |
-
Remove the bolts and the suspension support bar.
Torque: 22 lb.ft (30 Nm)
.jpg) |
-
Remove the cooling fan motor and shroud.
Refer to: Cooling Fan Motor and Shroud (303-03D Engine Cooling - 3.3L Duratec-V6 – Hybrid (BP), Removal and Installation).
-
Remove the A/C compressor outlet line mounting bracket retainer and position aside the line.
Torque: 80 lb.in (9 Nm)
.jpg) |
-
Disconnect the coolant hose and remove the high voltage battery coolant cooler.
Use the General Equipment: Hose Clamp(s)
Use the General Equipment: Hose Clamp Remover/Installer
.jpg) |
Installation
-
To install, reverse the removal procedure.
-
NOTICE: Only use the specified material to lubricate the seals.
Install and lubricate new O-ring seals. Refer to the appropriate Specifications in Group 412.
-
Lubricate the refrigerant system with the correct amount
of clean POE oil. Refer to the appropriate Refrigerant Oil Adding
procedure in Group 412.
 Removal and Installation - Cabin Heater Coolant Temperature Sensor
Special Tool(s) /
General Equipment
Hose Clamp(s)
Removal
NOTE:
Removal steps in this procedure may contain installation details.
Disconnect the electrical connector...
 Removal and Installation - Rear Evaporator Shutoff Valve
Removal
NOTE:
The rear evaporator shutoff valve is available only as part of the rear evaporator.
Remove the rear evaporator.
Refer to: Rear Evaporator (412-02 Rear Climate Control, Remov..
Other information:
Ford Explorer 2020-2025 Service Manual: Removal and Installation - Glove Compartment
Removal NOTE: Removal steps in this procedure may contain installation details. Push the stop tabs inwards and fully lower the glove compartment. Remove the glove compartment check strap. Remove the bolts and the glove compartment assembly...
Ford Explorer 2020-2025 Service Manual: Description and Operation - Body - Overview
Insulation WARNING: To prevent the risk of high-voltage shock, always follow precisely all warnings and service instructions, including instructions to depower the system. The high-voltage system utilizes approximately 300 volts DC, provided through high-voltage cables to its components and modules...
Categories
- Manuals Home
- 6th Generation Explorer Owners Manual
- 6th Generation Explorer Service Manual
- Diagnosis and Testing - Parking Brake - Vehicles With: Electric Brake Booster
- Removal and Installation - Liftgate Trim Panel
- General Procedures - Rear Camber Adjustment
- New on site
- Most important about car
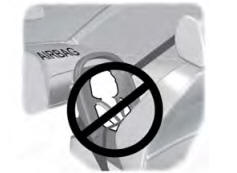
Children and Airbags
WARNING: Airbags can kill or injure a child in a child restraint. Never place a rear-facing child restraint in front of an active airbag. If you must use a forward-facing child restraint in the front seat, move the seat upon which the child restraint is installed all the way back.
Copyright © 2025 www.foexplorer.com