Ford Explorer: Rear Drive Axle/Differential / Removal and Installation - Axle Housing Bushing
Special Tool(s) / General Equipment
.jpg) |
205-1066 Installer, Bushing |
| Flat Headed Screw Driver | |
Removal
NOTE: Only worn or damaged bushings need to be replaced.
-
Remove the rear axle assembly.
Refer to: Axle Assembly (205-02 Rear Drive Axle/Differential, Removal and Installation).
-
-
NOTE: The rear axle bushings need to be installed in the same location as removed.
NOTE: Note the position of the component before removal. Flat surface is facing inside and in front of other side bushing.
Index-mark the rear axle front upper bushings and differential housing.
-
Using the general equipment, remove and discard the rear axle front upper bushings.
Use the General Equipment: Flat Headed Screw Driver
-
.jpg) |
-
-
NOTE: The rear axle bushings need to be installed in the same location as removed.
NOTE: Note the position of the component before removal. Flat surface is facing inside and in front of other side bushing.
Index-mark the rear axle front lower bushings and rear axle housing.
-
Using the general equipment, remove and discard the rear axle front lower bushings.
Use the General Equipment: Flat Headed Screw Driver
-
.jpg) |
Installation
-
NOTE: Make sure that the surface is clean and free of foreign material.
Clean and inspect the rear axle assembly at bushing mating surfaces.
.jpg) |
-
NOTE: Only one bushing is to be installed at a time.
NOTE: One side bushing shown, other side is similar.
NOTE: Make sure that the installation marks are aligned and flat surface is aligned inside.
NOTE: Press the bushing by hand initially.
Insert the new rear axle front lower bushings.
.jpg) |
-
NOTE: One side bushing shown, other side is similar.
Using the special tool, install the new rear axle front lower bushings.
Use Special Service Tool: 205-1066 Installer, Bushing.
.jpg) |
-
NOTE: Only one bushing is to be installed at a time.
NOTE: One side bushing shown, other side is similar.
NOTE: Make sure that the installation marks are aligned and flat surface is aligned inside.
NOTE: Press the bushing by hand initially.
Install the new rear axle front upper bushings.
-
Insert the new rear axle front upper bushings.
-
Using the special tool, install the new rear axle front upper bushing.
Use Special Service Tool: 205-1066 Installer, Bushing.
-
Insert the new rear axle front upper bushings.
.jpg) |
-
Install the rear axle assembly.
Refer to: Axle Assembly (205-02 Rear Drive Axle/Differential, Removal and Installation).
 Removal and Installation - Axle Assembly
Special Tool(s) /
General Equipment
Transmission Jack
Removal
NOTE:
Removal steps in this procedure may contain installation details.
Drain the rear differential fluid...
 Removal and Installation - Differential Carrier
Special Tool(s) /
General Equipment
205-220Installer, Differential ShimTKIT-1985-FH
Copper Hammer
Removal
Remove the differential housing cover...
Other information:
Ford Explorer 2020-2026 Owners Manual: Active Park Assist (If Equipped)
WARNING: You must remain in your vehicle when the system turns on. At all times, you are responsible for controlling your vehicle, supervising the system and intervening, if required. Failure to take care may result in the loss of control of your vehicle, serious personal injury or death...
Ford Explorer 2020-2026 Service Manual: Removal and Installation - Battery Tray
Removal NOTE: Removal steps in this procedure may contain installation details. Remove the battery. Refer to: Battery (414-01 Battery, Mounting and Cables, Removal and Installation). Detach the battery vent hose from the battery tray...
Categories
- Manuals Home
- 6th Generation Explorer Owners Manual
- 6th Generation Explorer Service Manual
- Driveline
- Interior Trim and Ornamentation
- Engine - 2.3L EcoBoost (201kW/273PS)
- New on site
- Most important about car
Windshield Wipers
 Push the lever up or down to operate
the windshield wipers.
Push the lever up or down to operate
the windshield wipers.
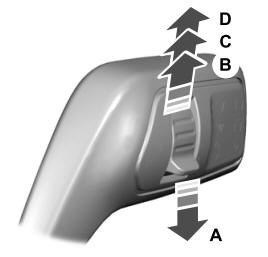
A - Single wipe.