Ford Explorer: Battery, Mounting and Cables / Removal and Installation - Auxiliary Battery Isolator
Ford Explorer 2020-2026 Service Manual / Electrical / Battery and Charging System / Battery, Mounting and Cables / Removal and Installation - Auxiliary Battery Isolator
Removal
NOTE: Removal steps in this procedure may contain installation details.
-
Disconnect the batteries.
Refer to: Battery Disconnect and Connect (414-01 Battery, Mounting and Cables, General Procedures).
-
-
Disconnect the electrical connector from the auxiliary battery isolator.
-
Remove the nut and position the battery positive terminal aside.
Torque: 80 lb.in (9 Nm)
-
Remove the nut and position the battery cables aside.
Torque: 80 lb.in (9 Nm)
-
Disconnect the electrical connector from the auxiliary battery isolator.
.jpg) |
-
Release the retainers and remove the auxiliary battery isolator.
.jpg) |
Installation
-
To install, reverse the removal procedure.
 Removal and Installation - Auxiliary Battery Cable
Removal
NOTE:
This procedure provides information about routing, retaining
points and connectors of the cable. It does not include the steps for
removing components to gain access to the cable...
 Removal and Installation - Battery
Removal
NOTE:
Removal steps in this procedure may contain installation details.
Disconnect the battery/batteries.
Refer to: Battery Disconnect and Connect (414-01 Battery, Mounting and ..
Other information:
Ford Explorer 2020-2026 Service Manual: Removal and Installation - Heated Oxygen Sensor (HO2S)
Special Tool(s) / General Equipment 303-476 (T94P-9472-A) Socket, Exhaust Gas Oxygen SensorTKIT-1994-LM/MTKIT-1994-FTKIT-1994-FLM/FM Materials Name Specification Motorcraft® High Temperature Nickel Anti-Seize LubricantXL-2 - Motorcraft® Penetrating and Lock LubricantXL-1 - Motorcraft® Silicone Brake Caliper Grease and Dielectric CompoundXG-3-A ..
Ford Explorer 2020-2026 Service Manual: Removal and Installation - Camshafts
Special Tool(s) / General Equipment 303-1685Alignment Tool, Camshaft 303-507Timing Peg, Crankshaft TDCTKIT-2001N-FLMTKIT-2001N-ROW Feeler Gauge Removal NOTE: During engine repair procedures, cleanliness is extremely important...
Categories
- Manuals Home
- 6th Generation Explorer Owners Manual
- 6th Generation Explorer Service Manual
- General Procedures - Rear Camber Adjustment
- Fuel Filler Funnel Location & Running Out of Fuel
- Electric Parking Brake
- New on site
- Most important about car
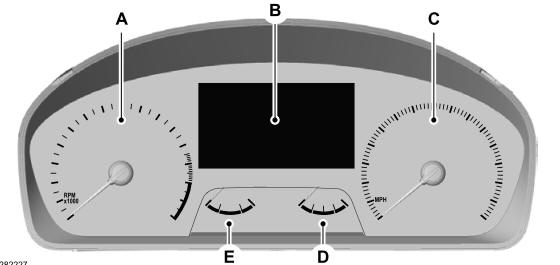
Gauges
4 Inch Display

A - Tachometer.
B - Information display.
C - Speedometer.
D - Fuel gauge.
E - Engine coolant temperature gauge.
Copyright © 2026 www.foexplorer.com
