Ford Explorer: Seatbelt Systems / Removal and Installation - Front Seatbelt Retractor and Pretensioner
Removal
.jpg) WARNING:
The following procedure prescribes critical repair steps
required for correct restraint system operation during a crash. Follow
all notes and steps carefully. Failure to follow step instructions may
result in incorrect operation of the restraint system and increases the
risk of serious personal injury or death in a crash.
WARNING:
The following procedure prescribes critical repair steps
required for correct restraint system operation during a crash. Follow
all notes and steps carefully. Failure to follow step instructions may
result in incorrect operation of the restraint system and increases the
risk of serious personal injury or death in a crash.
NOTE: Removal steps in this procedure may contain installation details.
NOTE: Driver side shown, except where called out.
-
Refer to: Pyrotechnic Device Health and Safety Precautions (100-00 General Information, Description and Operation)..jpg) WARNING:
Before beginning any service procedure in this
manual, refer to health and safety warnings in section 100-00 General
Information. Failure to follow this instruction may result in serious
personal injury.
WARNING:
Before beginning any service procedure in this
manual, refer to health and safety warnings in section 100-00 General
Information. Failure to follow this instruction may result in serious
personal injury.
-
Remove the upper B-pillar trim panel.
Refer to: B-Pillar Trim Panel (501-05 Interior Trim and Ornamentation, Removal and Installation).
-
Remove the bolt and position the front seatbelt retractor and pretensioner D-ring aside.
.jpg) |
-
Remove the bolt and the front seatbelt anchor and pretensioner bracket.
Torque: 35 lb.ft (47 Nm)
.jpg) |
Driver seatbelt retractor and pretensioner
-
Remove the front seatbelt retractor and pretensioner.
-
Detach the wiring harness retainer.
-
Remove the bolt.
Torque: 30 lb.ft (40 Nm)
-
Position the retractor up and out.
-
Disconnect the electrical connector.
-
Detach the wiring harness retainer.
.jpg) |
Front passenger seatbelt retractor and pretensioner
-
Remove the front seatbelt retractor and pretensioner.
-
Remove the bolt.
Torque: 30 lb.ft (40 Nm)
-
Position the retractor up and out.
-
Disconnect the electrical connectors.
-
Remove the bolt.
.jpg) |
Installation
NOTE: During installation, make sure the seatbelt webbing is not twisted and the seatbelts and buckles are accessible to the occupants.
-
To install, reverse the removal procedure.
-
Check the seatbelt system for correct operation.
Refer to: Seatbelt Systems (501-20A Seatbelt Systems, Diagnosis and Testing).
 Removal and Installation - Front Seatbelt Buckle
Removal
NOTE:
Removal steps in this procedure may contain installation details.
NOTE:
Base vehicle shown, police vehicle similar.
Remove the front seat...
 Removal and Installation - Seatbelt Shoulder Height Adjuster
Removal
NOTE:
Removal steps in this procedure may contain installation details.
NOTE:
Driver side shown, passenger side similar.
Remove the upper B-pillar trim panel...
Other information:
Ford Explorer 2020-2025 Service Manual: Removal and Installation - Transfer Case Clutch Actuator
Materials Name Specification Motorcraft® MERCON® LV Automatic Transmission FluidXT-10-QLVC WSS-M2C938-AMERCON® LV, Removal NOTE: Removal steps in this procedure may contain installation details. With the vehicle in NEUTRAL, position it on a hoist...
Ford Explorer 2020-2025 Owners Manual: Changing the Rear Wiper Blades
You can improve poor wiper quality by cleaning the wiper blades and the windshield. Replace the wiper blades at least annually for optimum performance. Lift the wiper arm.Note: Do not hold the wiper blade to lift the wiper arm. Remove the wiper blade...
Categories
- Manuals Home
- 6th Generation Explorer Owners Manual
- 6th Generation Explorer Service Manual
- Removal and Installation - Liftgate Trim Panel
- Electric Parking Brake
- Removal and Installation - Front Halfshaft Speed Sensor
- New on site
- Most important about car
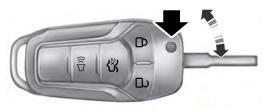
Integrated Keyhead Transmitter (If Equipped)
Use the key blade to start your vehicle and unlock or lock the driver door from outside your vehicle. The integrated keyhead transmitter functions as a programmed ignition key that operates all the locks and starts your vehicle, as well as a remote control.

