Ford Explorer: Body Closures / Removal and Installation - Front Door
Ford Explorer 2020-2026 Service Manual / Body and Paint / Body and Paint / Body Closures / Removal and Installation - Front Door
Removal
NOTE: Removal steps in this procedure may contain installation details.
NOTE: LH side shown, RH side similar.
-
Open the door.
.jpg) |
Vehicles with police package
-
Remove the check arm bolt and position aside the check arm and tether strap.
Torque: 18 lb.ft (25 Nm)
.jpg) |
Vehicles without Police package
-
Remove the check arm bolt and position aside the check arm.
Torque: 18 lb.ft (25 Nm)
.jpg) |
All Vehicles
-
Disconnect the front door electrical connector.
.jpg) |
-
NOTE: This step requires the aid of another technician.
Remove the door hinge pivot bolts.
Torque: 22 lb.ft (30 Nm)
.jpg) |
-
NOTE: This step requires the aid of another technician.
Remove the door.
.jpg) |
Installation
-
To install, reverse the removal procedure.
-
NOTE: This step is only necessary when installing a new component.
Check the door-to-body alignment. Align the door as necessary.
Refer to: Front Door Alignment (501-03 Body Closures, General Procedures).
 General Procedures - Rear Door Alignment
Adjustment
NOTE:
Removal steps in this procedure may contain installation details.
NOTE:
LH side shown, RH side similar.
All alignments
Open the rear door...
 Removal and Installation - Front Door Check Arm
Removal
NOTE:
Removal steps in this procedure may contain installation details.
NOTE:
LH side shown, RH side similar.
Open the door...
Other information:
Ford Explorer 2020-2026 Service Manual: Disassembly - Engine
Special Tool(s) / General Equipment 205-153 (T80T-4000-W) Handle 303-050 (T70P-6000) Lifting Bracket, Engine 303-1685Alignment Tool, Camshaft 303-1687Installer, VCT Solenoid Seal 303-1689Holding Tool, Crank Damper 303-409 (T92C-6700-CH) Remover, Crankshaft SealTKIT-1992-FH/FMH/FLMHTKIT-1993-LMH/MH 303-507Timing Peg, Crankshaft TDCTKIT-2001N-FL..
Ford Explorer 2020-2026 Service Manual: Description and Operation - Supplemental Climate Control - Component Location
..
Categories
- Manuals Home
- 6th Generation Explorer Owners Manual
- 6th Generation Explorer Service Manual
- General Procedures - Brake Service Mode Activation and Deactivation
- Auxiliary Power Points
- General Procedures - Transmission Fluid Drain and Refill
- New on site
- Most important about car
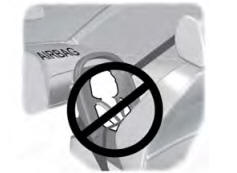
Children and Airbags
WARNING: Airbags can kill or injure a child in a child restraint. Never place a rear-facing child restraint in front of an active airbag. If you must use a forward-facing child restraint in the front seat, move the seat upon which the child restraint is installed all the way back.
Copyright © 2026 www.foexplorer.com