Ford Explorer: Body Closures / General Procedures - Rear Door Alignment
Adjustment
NOTE:
Removal steps in this procedure may contain installation details.
NOTE:
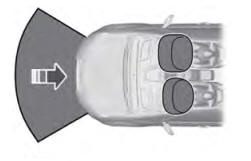
LH side shown, RH side similar.
All alignments
-
Open the rear door.
-
Remove the bolts and the striker assembly.
Torque:
18 lb.ft (25 Nm)
Rear door in and out, up and down alignment
-
Loosen the bolts to permit movement of the door.
Loosen:
:
2 turn(s)
-
Adjust the door as required.
-
Tighten the bolts.
Torque:
35 lb.ft (48 Nm)
Rear door fore, aft and tilt alignment
-
Remove the B-pillar trim panel.
Refer to: B-Pillar Trim Panel (501-05 Interior Trim and Ornamentation, Removal and Installation).
-
Depower the SRS.
Refer to: Supplemental Restraint System (SRS) Depowering (501-20B Supplemental Restraint System, General Procedures).
-
Remove the front seatbelt retractor and pretensioner.
Refer to: Front Seatbelt Retractor and Pretensioner (501-20A Seatbelt Systems, Removal and Installation).
-
Open the front door.
-
Loosen the nuts to permit movement of the door.
Loosen:
:
2 turn(s)
-
Carefully close the rear door.
-
Loosen the bolt to permit movement of the door.
Loosen:
:
2 turn(s)
-
Carefully close the front door.
-
Adjust the door as required.
-
Carefully open the front door.
-
Carefully open the rear door.
-
Tighten the nuts.
Torque:
26 lb.ft (35 Nm)
-
Tighten the bolt.
Torque:
89 lb.in (10 Nm)
-
Install the front seatbelt retractor and pretensioner.
Refer to: Front Seatbelt Retractor and Pretensioner (501-20A Seatbelt Systems, Removal and Installation).
-
Install the B-pillar trim panel.
Refer to: B-Pillar Trim Panel (501-05 Interior Trim and Ornamentation, Removal and Installation).
-
Repower the SRS.
Refer to: Supplemental Restraint System (SRS) Repowering (501-20B Supplemental Restraint System, General Procedures).
-
Check the active restraint system for correct operation.
Refer to: Seatbelt Systems (501-20A Seatbelt Systems, Diagnosis and Testing).
All alignments
-
Install the striker assembly.
Torque:
18 lb.ft (25 Nm)
-
Loosen the bolts to permit movement of the striker assembly.
Loosen:
:
2 turn(s)
-
Tighten the bolts.
Torque:
18 lb.ft (25 Nm)
-
Inspect the body-to-rear door alignment.
Initialization
Disconnect the battery or remove the RGTM fuse(s).
Refer to: Battery Disconnect and Connect (414-01 Battery, Mounting and Cables, General Procedures)...
Removal
NOTE:
Removal steps in this procedure may contain installation details.
NOTE:
LH side shown, RH side similar.
Open the door...
Other information:
Materials
Name
Specification
Motorcraft® MERCON® ULV Automatic Transmission FluidXT-12-QULV
WSS-M2C949-A, MERCON® ULV
Removal
All Solenoids
Remove the transmission fluid pan gasket and filter.
Refer to: Transmission Fluid Pan, Gasket and Filter (307-01B Automatic Transmission - 10-Speed Automatic Transmission – 10R80, Removal and Installation)...
Removal
NOTE:
Removal steps in this procedure may contain installation details.
Remove the air cleaner outlet pipe.
Refer to: Air Cleaner Outlet Pipe (303-12A Intake Air Distribution and Filtering - 2.3L EcoBoost (201kW/273PS), Removal and Installation)...
Categories
WARNING: Do not place your arms on the airbag cover or through the steering
wheel. Failure to follow this instruction could result in personal injury.
WARNING: Keep the areas in front of the airbags free from obstruction.
Do not affix anything to or over the airbag covers. Objects could become projectiles
during airbag deployment or in a sudden stop. Failure to follow this instruction
could result in personal injury or death.
WARNING: Airbags can kill or injure a child in a child restraint. Never
place a rear-facing child restraint in front of an active airbag. If you must use
a forward-facing child restraint in the front seat, move the seat upon which the
child restraint is installed all the way back.
read more
.jpg)
.jpg)
.jpg)
.jpg)
.jpg)
.jpg)
.jpg)
.jpg)
.jpg)
.jpg)
.jpg)
.jpg)
.jpg)
.jpg)
.jpg)
.jpg)
.jpg)
 General Procedures - Power Liftgate Initialization
 Removal and Installation - Front Door