Ford Explorer: Parking Aids / Rear View Camera
WARNING: The rear view camera system is a reverse aid supplement device that still requires the driver to use it in conjunction with the interior and exterior mirrors for maximum coverage.
WARNING: Objects that are close to either corner of the bumper or under the bumper, might not be seen on the screen due to the limited coverage of the camera system.
WARNING: Reverse your vehicle slowly. Failure to follow this instruction could result in the loss of control of your vehicle, personal injury or death.
WARNING: Use caution when the rear cargo door is ajar. If the rear cargo door is ajar, the camera will be out of position and the video image may be incorrect. All guidelines disappear when the rear cargo door is ajar. Failure to follow this instruction could result in personal injury.
WARNING: Use caution when turning camera features on or off when the transmission is not in park (P). Make sure your vehicle is not moving.
Note: Some vehicles may not come equipped with guidelines.
The rear view camera system provides a video image of the area behind your vehicle.
During operation, lines appear in the display which represent your vehicle’s path and proximity to objects behind your vehicle.
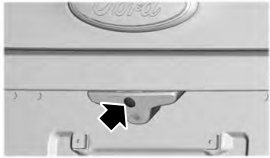
The camera is located on the luggage compartment door.
Using the Rear View Camera System
The rear view camera system displays what is behind your vehicle when you place the transmission in reverse (R).
Note: The reverse sensing system is not effective at speeds above 3 mph (5 km/h) and may not detect certain angular or moving objects.
The system uses three types of guides to help you see what is behind your vehicle:
- Active guidelines (if equipped): Show the intended path of your vehicle when reversing.
- Fixed guidelines: Show the actual path your vehicle is moving in while reversing in a straight line. This can be helpful when backing into a parking space or aligning your vehicle with another object behind you.
- Centerline: Helps align the center of your vehicle with an object (for example, a trailer).
Note: If the transmission is in reverse (R) and the luggage compartment door or liftgate is open, no rear view camera features will display.
Note: When towing, the camera only sees what you are towing. This might not provide adequate coverage as it usually provides in normal operation and some objects might not be seen. In some vehicles, the guidelines may disappear when you connect the trailer tow connector.
The camera may not operate correctly under the following conditions:
- Nighttime or dark areas if one or both reverse lamps are not operating.
- Mud, water or debris obstructs the camera's view. Clean the lens with a soft, lint-free cloth and non-abrasive cleaner. You can also use the rear washer to clean the camera. See Rear Window Wiper and Washers.
- The rear of your vehicle is hit or damaged, causing the camera to become misaligned.
Camera System Settings
The rear view camera system settings can be accessed through the touchscreen. See Settings.
Camera Guidelines
Note: Active guidelines are only available when the transmission is in reverse (R).
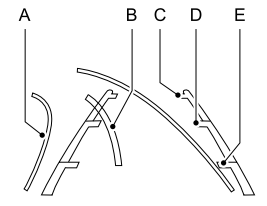
A - Active guidelines (If equipped)
B - Centerline
C - Fixed guideline: Green zone
D - Fixed guideline: Yellow zone
E - Fixed guideline: Red zone
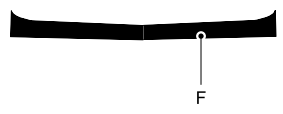
F - Rear bumper
Active guidelines are only shown with fixed guidelines. To use active guidelines, turn the steering wheel to point the guidelines toward an intended path. If you change the steering wheel position while reversing, your vehicle might deviate from the original intended path.
The fixed and active guidelines fade in and out depending on the steering wheel position. The active guidelines do not display when the steering wheel position is straight.
Always use caution while reversing. Objects in the red zone are closest to your vehicle and objects in the green zone are farther away. Objects are getting closer to your vehicle as they move from the green zone to the yellow or red zones. Use the side view mirrors and rear view mirror to get better coverage on both sides and rear of the vehicle.
Obstacle Distance Indicator (If Equipped)
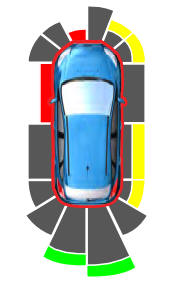
The system will provide an image of your vehicle and the sensor zones. The zones will highlight green, yellow and red when the parking aid sensors detect an object in the coverage area.
Manual Zoom
WARNING: When manual zoom is on, the full area behind your vehicle may not show. Be aware of your surroundings when using the manual zoom feature.
Note: Manual zoom is only available when the transmission is in reverse (R).
Note: When you enable manual zoom, only the centerline is shown.
Selectable settings for this feature are Zoom in (+) and Zoom out (-). Press the symbol in the camera screen to change the view. The default setting is Zoom OFF.
This allows you to get a closer view of an object behind your vehicle. The zoomed image keeps the bumper in the image to provide a reference. The zoom is only active while the transmission is in reverse (R).
Rear Camera Delay
Selectable settings for this feature are ON and OFF.
The default setting for the rear camera delay is OFF.
When shifting the transmission out of reverse (R) and into any gear other than park (P), the camera image remains in the display until:
- Your vehicle speed reaches approximately 5 mph (8 km/h).
- You shift your vehicle into park (P).
 Active Park Assist (If Equipped)
WARNING: You must remain in your vehicle when the system turns on. At all
times, you are responsible for controlling your vehicle, supervising the system
and intervening, if required...
 360 Degree Camera (If Equipped)
WARNING: The 360 degree camera system still requires the driver to use
it in conjunction with looking out of the windows, and checking the interior and
exterior mirrors for maximum coverage...
Other information:
Ford Explorer 2020-2026 Service Manual: Removal and Installation - Steering Column Lower Shaft
Removal NOTE: Removal steps in this procedure may contain installation details. NOTICE: Do not allow the steering column to rotate while the steering column shaft is disconnected or damage to the steering column internal sensor may result...
Ford Explorer 2020-2026 Owners Manual: Crash Sensors and Airbag Indicator
WARNING: Modifying or adding equipment to the front end of your vehicle (including hood, bumper system, frame, front end body structure, tow hooks and hood pins) may affect the performance of the airbag system, increasing the risk of injury. Do not modify or add equipment to the front end of your vehicle...
Categories
- Manuals Home
- 6th Generation Explorer Owners Manual
- 6th Generation Explorer Service Manual
- Removal and Installation - Front Halfshaft Speed Sensor
- Auxiliary Power Points
- Description and Operation - Jacking and Lifting - Overview
- New on site
- Most important about car
Gauges
4 Inch Display

A - Tachometer.
B - Information display.
C - Speedometer.
D - Fuel gauge.
E - Engine coolant temperature gauge.