Ford Explorer: Information and Entertainment System - General Information - Vehicles With: SYNC 3 / General Procedures - SYNC Module [APIM] Programming
Programming
-
NOTE: If a new APIM is being installed, install the new APIM before carrying out the following procedure.
- If replacing the APIM do not connect the new APIM to a Wi-Fi network before completing scan tool APIM replacement programming as it may cause programming concerns.
- This programming procedure deletes any phones that are paired with the SYNC system.
- To prevent timeout errors and to minimize programming time, a hardwired Internet connection is strongly recommended when programming.
-
A USB flash drive with a minimum storage size of 32 gigabytes (GB) is required for this procedure (obtain locally).
- Some programming files are large, allow extra time for the files to download.
- It is important that the diagnostic scan tool has enough available hard drive space to accommodate the programming file download.
- If a "Disk Space Error" is received, create additional free space on the hard drive.
-
The diagnostic scan tool is required.
- Make sure the FDRS version and patch software levels are up to date.
-
Connect the diagnostic scan tool to a power supply due to the length of time the programming requires.
-
Connect the diagnostic scan tool to the DLC.
-
Identify/enter the vehicle being programmed on FDRS.
-
Select TOOLBOX>APIM under HS-CAN1 module list.
-
NOTE: There are 3 types of APIM programming available:
- APIM Standard Programming — Used to update the APIM and any currently installed Applications to the latest software levels. This option is not available if the APIM is already at the latest level.
- APIM Programming — Used to download configuration data to the APIM. The APIM may also be programmed, depending on current software level, when this option is selected.
- APIM Replacement Programming — Used when the APIM has been replaced. This type of programming performs the required provisioning (restores software for newly installed hardware).
-
NOTE: Do not disconnect the FDRS during APIM programming unless directed by the diagnostic scan tool onscreen prompts.
Follow the diagnostic scan tool on-screen directions.
-
When prompted, connect the USB flash drive to the diagnostic scan tool.
-
Make sure the USB
flash drive being used is formatted correctly. To see the available
drives, hold down the Windows icon keyboard key and press the E keyboard
key. Right click on the removable drive, and select Properties. If
“File system” under the General tab is not exFAT, the drive must be
formatted. To format the flash drive, right click on the removable
drive, select Format, select “exFAT” for the File system, and select
“Default allocation size” for the Allocation unit size. De-selecting
Quick Format is not necessary, and results in a more lengthy operation.
-
Follow the on-screen instructions to download software onto the flash drive.
-
When prompted by the diagnostic scan tool, safely remove
the flash drive from the diagnostic scan tool and connect it to the USB hub to install the software into the APIM. The update starts automatically, and may take 10 minutes or longer. It is normal for the APIM to reset during this step.
-
NOTE: It is not necessary to reinsert the flash drive in the laptop to report the update to the Ford database after the APIM has been updated in the vehicle. This occurs automatically with the scan tool connected to the vehicle with FDRS.
Once the pop up stating “Installation Complete” appears, select “Close,” remove the flash drive from the USB hub. It is normal for the APIM to reset during this step.
-
NOTE: The software level installed during programming can be determined by selecting the Vehicle Identification Tab>Vehicle Info. The software level installed can also be determined from the OASIS tab on the technician service publication website. Select the "SYNC" button and "Last Recorded State — Software" displays.
After programming is complete, the diagnostic scan tool displays "Programming has been successfully completed."
 General Procedures - Bezel Diagnostics
Check
NOTE:
If there is a concern with one of the following components
and Bezel Diagnostics cannot be accessed, obtain the module part number
by referencing the label attached to the module...
 General Procedures - Speaker Audio Test
Activation
NOTE:
The procedure used to download the audio files varies, depending on the web browser used.
Using a suitable web browser, download all of the diagnostic sound tracks to a su..
Other information:
Ford Explorer 2020-2026 Service Manual: Removal and Installation - Roof Rail
Removal NOTE: Removal steps in this procedure may contain installation details. NOTE: LH side shown, RH side similar. Lower the headliner. Refer to: Headliner - Lowering (501-05 Interior Trim and Ornamentation, Removal and Installation)...
Ford Explorer 2020-2026 Service Manual: Diagnosis and Testing - Rear Drive Halfshafts
Preliminary Inspection Visually inspect the CV joints, housing, boots, and clamps for obvious signs of mechanical damage. If an obvious cause for an observed or reported concern is found, correct the cause (if possible) before proceeding to the next step If the cause is not visually evident, verify the symptom and REFER to Symptom Chart: NVH...
Categories
- Manuals Home
- 6th Generation Explorer Owners Manual
- 6th Generation Explorer Service Manual
- General Service Information
- Auxiliary Power Points
- Body and Paint
- New on site
- Most important about car
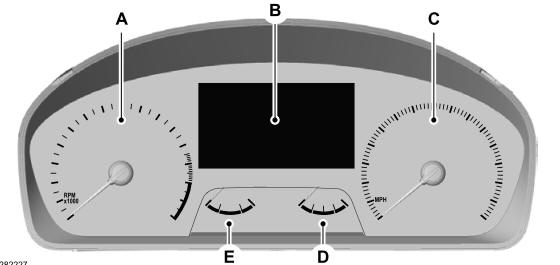
Gauges
4 Inch Display

A - Tachometer.
B - Information display.
C - Speedometer.
D - Fuel gauge.
E - Engine coolant temperature gauge.
