Ford Explorer: Second Row Seats / Removal and Installation - Second Row Seat Head Restraint Guide Sleeve
Ford Explorer 2020-2025 Service Manual / Body and Paint / Body and Paint / Second Row Seats / Removal and Installation - Second Row Seat Head Restraint Guide Sleeve
Special Tool(s) / General Equipment
| Flat-Bladed Screwdriver |
Removal
Second row outboard seat - Base vehicle
-
-
Push the second row outboard seat head restraint release buttons.
-
Remove the second row outboard seat head restraint.
-
Push the second row outboard seat head restraint release buttons.
.jpg) |
Second row outboard seat - Police vehicle
-
Remove the second row outboard seat head restraint.
-
Push down on the second row outboard seat
backrest cover to gain access to the second row outboard seat head
restraint retaining clip.
-
Remove and discard the second row outboard seat head restraint retaining clip.
-
Push the second row outboard seat head restraint release button.
-
Push down on the second row outboard seat
backrest cover to gain access to the second row outboard seat head
restraint retaining clip.
.jpg) |
Second row center seat
-
Remove the second row center seat head restraint.
-
Push down on the second row center seat backrest
cover to gain access to the second row center seat head restraint
retaining clip.
-
Remove and discard the second row head restraint retaining clip.
-
Push the second row center seat head restraint release button.
-
Push down on the second row center seat backrest
cover to gain access to the second row center seat head restraint
retaining clip.
.jpg) |
All seats
-
NOTE: Follow the unique instructions or graphics for this step in the installation.
-
Release the tab.
Use the General Equipment: Flat-Bladed Screwdriver
-
Remove the second row head restraint guide sleeve.
-
Release the tab.
.jpg) |
Installation
-
To install, reverse the removal procedure.
-
Allow the head restraint guide sleeve to slide freely
through the backrest foam and backrest trim cover. Using hand pressure,
twist the head restraint guide sleeve while pushing it into the backrest
frame until the tab is locked into place.
.jpg) |
 Removal and Installation - Second Row Single Seat Armrest - Vehicles With: Second Row Captain Chairs
Removal
NOTE:
Removal steps in this procedure may contain installation details.
Unzip the second row single seat armrest cover.
Remove the second row si..
 Removal and Installation - Second Row Single Seat Backrest Cover
Special Tool(s) /
General Equipment
Interior Trim Remover
Removal
NOTE:
Base vehicle shown, police vehicle similar.
NOTE:
LH (left hand) shown, RH (right hand) similar...
Other information:
Ford Explorer 2020-2025 Service Manual: Removal and Installation - Transmission - 3.0L EcoBoost
Special Tool(s) / General Equipment 307-346 (T97T-7902-A) Retainer, Torque ConverterTKIT-1998-LM (NavigatoR)TKIT-1997-F/FLM/LT Magnetic Socket Transmission Jack Wooden Block Materials Name Specification Motorcraft® Multi-Purpose Grease SprayXL-5-A ESB-M1C93-B Motorcraft® MERCON® ULV Automatic Transmission FluidXT-12-QULV WSS-M2C949-A, MERCON®..
Ford Explorer 2020-2025 Owners Manual: Rear View Camera
WARNING: The rear view camera system is a reverse aid supplement device that still requires the driver to use it in conjunction with the interior and exterior mirrors for maximum coverage. WARNING: Objects that are close to either corner of the bumper or under the bumper, might not be seen on the screen due to the limited coverage of the camera system...
Categories
- Manuals Home
- 6th Generation Explorer Owners Manual
- 6th Generation Explorer Service Manual
- Description and Operation - Jacking and Lifting - Overview
- Engine
- Description and Operation - Identification Codes
- New on site
- Most important about car
Gauges
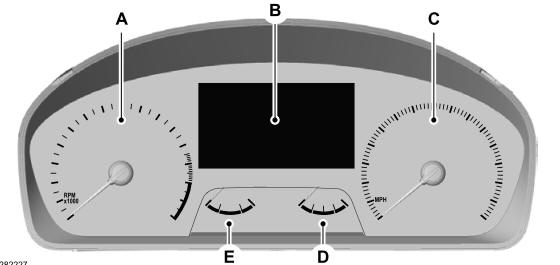
4 Inch Display

A - Tachometer.
B - Information display.
C - Speedometer.
D - Fuel gauge.
E - Engine coolant temperature gauge.
Copyright © 2025 www.foexplorer.com
