Ford Explorer: Roof Sheet Metal Repairs / Removal and Installation - Roof Reinforcement
Special Tool(s) / General Equipment
| Resistance Spotwelding Equipment | |
| Hot Air Gun | |
| Spot Weld Drill Bit | |
| Locking Pliers |
Materials
| Name | Specification |
|---|---|
| Metal Bonding Adhesive TA-1, TA-1-B, 3M™ 08115, LORD Fusor® 108B |
- |
Removal
NOTE: Vehicles equipped with a roof opening panel will use the rear most roof reinforcement only.
-
Refer to: Health and Safety Precautions (100-00 General Information, Description and Operation)..jpg) WARNING:
Before beginning any service procedure in this
manual, refer to health and safety warnings in section 100-00 General
Information. Failure to follow this instruction may result in serious
personal injury.
WARNING:
Before beginning any service procedure in this
manual, refer to health and safety warnings in section 100-00 General
Information. Failure to follow this instruction may result in serious
personal injury.
Refer to: High Voltage System Health and Safety Precautions - Overview (100-00 General Information, Description and Operation).
-
Remove the roof panel.
Refer to: Roof Panel (501-28 Roof Sheet Metal Repairs, Removal and Installation).
Refer to: Roof Panel - Vehicles With: Roof Opening Panel (501-28 Roof Sheet Metal Repairs, Removal and Installation).
-
Remove the welds.
Use the General Equipment: Spot Weld Drill Bit
.jpg) |
-
Remove the roof reinforcement.
.jpg) |
-
If Equipped:
Remove the harmonic damper.
Use the General Equipment: Hot Air Gun
.jpg) |
Installation
NOTE: Factory welds may be replaced with resistance spot welds or MIG plug welds. Resistance spot welds may not be placed directly over original factory location. They must be place adjacent to original location and equal in quantity to factory welds.
NOTE: MIG plug welds must be pre-drill to 8 mm and equal factory welds in both location and quantity.
NOTE: Vehicles equipped with a roof opening panel will use the rear most roof reinforcement only.
-
Refer to: Health and Safety Precautions (100-00 General Information, Description and Operation)..jpg) WARNING:
Before beginning any service procedure in this
manual, refer to health and safety warnings in section 100-00 General
Information. Failure to follow this instruction may result in serious
personal injury.
WARNING:
Before beginning any service procedure in this
manual, refer to health and safety warnings in section 100-00 General
Information. Failure to follow this instruction may result in serious
personal injury.
Refer to: High Voltage System Health and Safety Precautions - Overview (100-00 General Information, Description and Operation).
-
If Equipped:
Install the harmonic damper.
Material: Metal Bonding Adhesive / TA-1, TA-1-B, 3M™ 08115, LORD Fusor® 108B
.jpg) |
-
Install, properly position and clamp the roof reinforcement.
Use the General Equipment: Locking Pliers
.jpg) |
-
Install the welds.
Use the General Equipment: Resistance Spotwelding Equipment
.jpg) |
-
Install the roof.
Refer to: Roof Panel (501-28 Roof Sheet Metal Repairs, Removal and Installation).
Refer to: Roof Panel - Vehicles With: Roof Opening Panel (501-28 Roof Sheet Metal Repairs, Removal and Installation).
 Removal and Installation - Roof Rear Frame
Special Tool(s) /
General Equipment
Resistance Spotwelding Equipment
Spot Weld Drill Bit
Locking Pliers
Removal
WARNING:
Before beginning any service procedure in..
Other information:
Ford Explorer 2020-2026 Owners Manual: The Better Business Bureau (BBB) Auto Line Program (U.S. Only)
Your satisfaction is important to Ford Motor Company and to your dealer. If a warranty concern has not been resolved using the three-step procedure outlined earlier in this chapter in the Getting the Services you need section, you may be eligible to participate in the BBB AUTO LINE program...
Ford Explorer 2020-2026 Service Manual: Disassembly and Assembly - Driveshaft Center Bearing
Special Tool(s) / General Equipment Hydraulic Press Bearing Separator Materials Name Specification Motorcraft® Premium Long-Life GreaseXG-1-E1 ESA-M1C75-B DISASSEMBLY Remove the rear driveshaft slip yoke boot...
Categories
- Manuals Home
- 6th Generation Explorer Owners Manual
- 6th Generation Explorer Service Manual
- Automatic Transmission
- Automatic Transmission - 10-Speed Automatic Transmission – 10R60
- Using Tether Straps
- New on site
- Most important about car
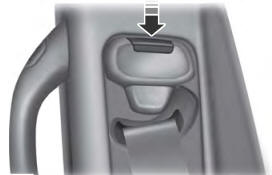
Seatbelt Height Adjustment
WARNING: Position the seatbelt height adjuster so that the seatbelt rests across the middle of your shoulder. Failure to adjust the seatbelt correctly could reduce its effectiveness and increase the risk of injury in a crash.


