
Kia Picanto: Handles, Locks, Latches and Entry Systems / Removal and Installation - Liftgate Latch
Ford Explorer 2020-2026 Service Manual / Body and Paint / Body and Paint / Handles, Locks, Latches and Entry Systems / Removal and Installation - Liftgate Latch
Removal
NOTE: Removal steps in this procedure may contain installation details.
-
Remove the liftgate trim panel.
Refer to: Liftgate Trim Panel (501-05 Interior Trim and Ornamentation, Removal and Installation).
-
Remove the liftgate latch bolts.
Torque: 177 lb.in (20 Nm)
 |
-
NOTE: Liftgate shown transparent for clarity.
Remove the liftgate latch.
-
Disconnect the electrical connector(s).
-
Remove the liftgate latch.
-
Disconnect the electrical connector(s).
 |
Installation
-
To install, reverse the removal procedure.
-
Carry out the power liftgate Initialization
Refer to: Power Liftgate Initialization (501-03 Body Closures, General Procedures).
 Removal and Installation - Keyless Entry Rear Antenna
Special Tool(s) /
General Equipment
Interior Trim Remover
Removal
Position the liftgate weatherstrip aside.
Remove the liftgate scuff plate trim..
 Removal and Installation - Liftgate Latch - Police
Removal
NOTE:
Removal steps in this procedure may contain installation details.
Remove the liftgate trim panel.
Refer to: Liftgate Trim Panel (501-05 Interior Trim and Ornamentation, Re..
Other information:
Ford Explorer 2020-2026 Service Manual: Removal and Installation - Oil Cooler
Special Tool(s) / General Equipment Hose Clamp Remover/Installer Locking Pliers Removal NOTE: During engine repair procedures, cleanliness is extremely important. Any foreign material (including any material created while cleaning gasket surfaces) that enters the oil passages, coolant passages or the oil pan can cause engine failure...
Ford Explorer 2020-2026 Service Manual: Removal and Installation - Rocker Panel
Special Tool(s) / General Equipment Resistance Spotwelding Equipment Spherical Cutter Plasma Cutter Air Body Saw 8 mm Drill Bit MIG/MAG Welding Equipment Spot Weld Drill Bit Locking Pliers Materials Name Specification Seam SealerTA-2-B, 3M™ 08308, LORD Fusor® 805DTM - Removal WARNING: Electric vehicles damaged by a ..
Categories
- Manuals Home
- 6th Generation Explorer Owners Manual
- 6th Generation Explorer Service Manual
- Description and Operation - Jacking and Lifting - Overview
- Electric Parking Brake
- Auxiliary Power Points
- New on site
- Most important about car
Gauges
4 Inch Display
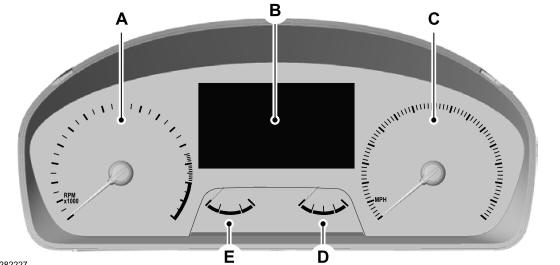
A - Tachometer.
B - Information display.
C - Speedometer.
D - Fuel gauge.
E - Engine coolant temperature gauge.

Copyright © 2026 www.foexplorer.com