Ford Explorer: Exterior Trim and Ornamentation / Removal and Installation - Front Fender Moulding
Ford Explorer 2020-2026 Service Manual / Body and Paint / Body and Paint / Exterior Trim and Ornamentation / Removal and Installation - Front Fender Moulding
Removal
NOTE: Removal steps in this procedure may contain installation details.
NOTE: LH side shown, RH side similar.
-
Remove the screws.
.jpg) |
-
Remove the push pins.
.jpg) |
-
If vehicles with active park assist.
Remove the front active park assist sensor.
Refer to: Front Active Park Assist Sensors (413-13C Parking Aid - Vehicles With: Active Park Assist, Removal and Installation).
-
Remove the retainer clips and front fender moulding.
.jpg) |
Installation
-
To install, reverse the removal procedure.
 Removal and Installation - Front Door Upper Moulding
Removal
NOTE:
Removal steps in this procedure may contain installation details.
NOTE:
LH side shown, RH similar.
All vehicles
Lower the door window glass completely...
 Removal and Installation - Liftgate Moulding
Removal
NOTE:
Removal steps in this procedure may contain installation details.
Remove the liftgate trim panel.
Refer to: Liftgate Trim Panel (501-05 Interior Trim and Ornamentation, ..
Other information:
Ford Explorer 2020-2026 Owners Manual: MOBILE COMMUNICATIONS EQUIPMENT
WARNING: Driving while distracted can result in loss of vehicle control, crash and injury. We strongly recommend that you use extreme caution when using any device that may take your focus off the road. Your primary responsibility is the safe operation of your vehicle...
Ford Explorer 2020-2026 Service Manual: Removal and Installation - Steering Column Tilt Motor
Removal NOTE: Removal steps in this procedure may contain installation details. Remove the steering column. Refer to: Steering Column (211-04 Steering Column, Removal and Installation). NOTE: Note the position of the component before removal...
Categories
- Manuals Home
- 6th Generation Explorer Owners Manual
- 6th Generation Explorer Service Manual
- Removal and Installation - Front Halfshaft Speed Sensor
- Automatic Transmission
- Body and Paint
- New on site
- Most important about car
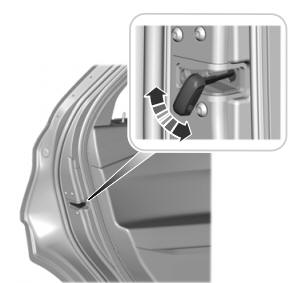
Child Safety Locks
When these locks are set, you cannot open the rear doors from the inside.

A child safety lock is on the rear edge of each rear door. You must set the child safety lock separately on each door.
Left-Hand Side
Copyright © 2026 www.foexplorer.com
