Ford Explorer: Evaporative Emissions - 2.3L EcoBoost (201kW/273PS) / Removal and Installation - Evaporative Emission Canister
Removal
.jpg) WARNING:
Do not smoke, carry lighted tobacco or have an open flame of
any type when working on or near any fuel-related component. Highly
flammable mixtures may be present and may be ignited. Failure to follow
these instructions may result in serious personal injury.
WARNING:
Do not smoke, carry lighted tobacco or have an open flame of
any type when working on or near any fuel-related component. Highly
flammable mixtures may be present and may be ignited. Failure to follow
these instructions may result in serious personal injury.
WARNING:
Do not carry personal electronic devices such as cell
phones, pagers or audio equipment of any type when working on or near
any fuel-related component. Highly flammable mixtures may be present and
may be ignited. Failure to follow these instructions may result in
serious personal injury.
WARNING:
Always disconnect the battery ground cable at the battery
when working on an evaporative emission (EVAP) system or fuel-related
component. Highly flammable mixtures may be present and may be ignited.
Failure to follow these instructions may result in serious personal
injury.
NOTE: Removal steps in this procedure may contain installation details.
-
With the vehicle in NEUTRAL, position it on a hoist.
Refer to: Jacking and Lifting - Overview (100-02 Jacking and Lifting, Description and Operation).
-
-
Remove the fasteners.
Torque: 53 lb.in (6 Nm)
-
Remove the fasteners.
-
Remove the fasteners.
Torque: 53 lb.in (6 Nm)
-
Remove the push pin.
-
Remove the fasteners.
Torque: 53 lb.in (6 Nm)
-
Remove the fasteners.
.jpg) |
-
-
Disconnect the electrical connector.
-
Disconnect the vapour vent hose.
-
Disconnect the quick release couplings.
Refer to: Quick Release Coupling (310-00A Fuel System - General Information - 2.3L EcoBoost (201kW/273PS), General Procedures).
-
Disconnect the electrical connector.
.jpg) |
-
Remove the fasteners and EVAP canister along with bracket.
Torque: 62 lb.in (7 Nm)
.jpg) |
Installation
-
NOTE: Ensure new EVAP canister mounting clips and bracket are used.
-
To install, reverse the removal procedure.
 General Procedures - Evaporative Emission System Leak Test
Activation
Phase 1 - Leak Verification
Run the EVAP Test with the scan tool.
NOTE:
Some small leaks may not be detected using the EVAP Test...
 Removal and Installation - Evaporative Emission Canister Purge Valve
Materials
Name
Specification
Motorcraft® Silicone Brake Caliper Grease and Dielectric CompoundXG-3-A
ESE-M1C171-A
Removal
WARNING:
Do not smoke, carry lighted t..
Other information:
Ford Explorer 2020-2026 Service Manual: Removal and Installation - Front Seat Backrest Blower Motor
Special Tool(s) / General Equipment Interior Trim Remover Removal NOTE: Driver seat shown, passenger seat similar. Remove the front seat. Refer to: Front Seat (501-10A Front Seats, Removal and Installation). Release the front seat backrest panel straps...
Ford Explorer 2020-2026 Service Manual: Removal and Installation - Shift Solenoids (SS)
Materials Name Specification Motorcraft® MERCON® ULV Automatic Transmission FluidXT-12-QULV WSS-M2C949-A, MERCON® ULV Removal All Solenoids Remove the transmission fluid pan gasket and filter. Refer to: Transmission Fluid Pan, Gasket and Filter (307-01B Automatic Transmission - 10-Speed Automatic Transmission – 10R80, Removal and Installation)...
Categories
- Manuals Home
- 6th Generation Explorer Owners Manual
- 6th Generation Explorer Service Manual
- Automatic Transmission - 10-Speed Automatic Transmission – 10R60
- Engine - 2.3L EcoBoost (201kW/273PS)
- Description and Operation - Identification Codes
- New on site
- Most important about car
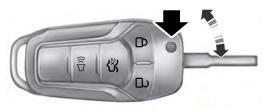
Integrated Keyhead Transmitter (If Equipped)
Use the key blade to start your vehicle and unlock or lock the driver door from outside your vehicle. The integrated keyhead transmitter functions as a programmed ignition key that operates all the locks and starts your vehicle, as well as a remote control.