Ford Explorer: Seatbelt Systems / Removal and Installation - Second Row Seatbelt Buckle
Ford Explorer 2020-2026 Service Manual / Body and Paint / Body and Paint / Seatbelt Systems / Removal and Installation - Second Row Seatbelt Buckle
Special Tool(s) / General Equipment
| Interior Trim Remover |
Removal
NOTE: Removal steps in this procedure may contain installation details.
NOTE: LH (left-hand) shown, RH (right-hand) seat similar.
NOTE: Single seat shown, captain chair similar.
-
Remove the second row seat.
Refer to: Second Row Seat (501-10B Second Row Seats, Removal and Installation).
Refer to: Second Row Seat - Vehicles With: Second Row Captain Chairs (501-10B Second Row Seats, Removal and Installation).
-
Detach and disconnect the second row seatbelt buckle electrical connector.
.jpg) |
-
Detach the second row seat valance.
-
Release the retainer.
-
Release the retainer.
-
Release the retainer.
.jpg) |
-
Remove the second row seat inboard side shield.
-
Remove the screw.
-
Detach the retainers.
Use the General Equipment: Interior Trim Remover
-
Lift the side shield and pull outward.
-
Lift the side shield and pull outward.
-
Push the side shield forward.
-
Remove the screw.
.jpg) |
-
Remove the second row seatbelt buckle.
-
Remove the bolt.
Torque: 30 lb.ft (40 Nm)
-
Release the elastic strap.
-
Remove the bolt.
.jpg) |
Installation
NOTE: During installation, make sure the seatbelt webbing is not twisted and the seatbelts and buckles are accessible to the occupants.
-
To install, reverse the removal procedure.
-
Check the seatbelt system for correct operation.
Refer to: Seatbelt Systems (501-20A Seatbelt Systems, Diagnosis and Testing).
 Removal and Installation - Second Row Center Seatbelt Retractor
Removal
NOTE:
Removal steps in this procedure may contain installation details.
NOTE:
Base vehicle shown, police vehicle similar.
Remove the second row center seat...
 Removal and Installation - Second Row Seatbelt Buckle - Police
Removal
NOTE:
Removal steps in this procedure may contain installation details.
NOTE:
LH (left-hand) shown, RH (right-hand) similar.
Remove the second row seat...
Other information:
Ford Explorer 2020-2026 Owners Manual: At a Glance - ST
Exterior Front and rear fascias feature unique ST grille and unique finish. ST badging in front grille and on rear liftgate. Trim features unique ST gloss black finish. E-X-P-L-O-R-E-R lettering across hood. Blackout treatment on headlight and taillight lenses...
Ford Explorer 2020-2026 Owners Manual: Utilizing the Mediation/Arbitration Program (Canada Only)
For vehicles delivered to authorized Canadian dealers. In those cases where you continue to feel that the efforts by Ford of Canada and the authorized dealer to resolve a factory-related vehicle service concern have been unsatisfactory, Ford of Canada participates in an impartial third party mediation/arbitration program administered by the Canadian Motor Vehicle Arbitration Plan (CAMVAP)...
Categories
- Manuals Home
- 6th Generation Explorer Owners Manual
- 6th Generation Explorer Service Manual
- Interior Trim and Ornamentation
- Fuel Filler Funnel Location & Running Out of Fuel
- Description and Operation - Jacking and Lifting - Overview
- New on site
- Most important about car
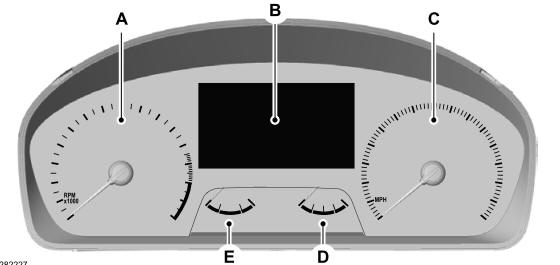
Gauges
4 Inch Display

A - Tachometer.
B - Information display.
C - Speedometer.
D - Fuel gauge.
E - Engine coolant temperature gauge.
Copyright © 2026 www.foexplorer.com
