
Ford Explorer: Exterior Trim and Ornamentation / Removal and Installation - Rear Quarter Panel Moulding
Ford Explorer 2020-2026 Service Manual / Body and Paint / Body and Paint / Exterior Trim and Ornamentation / Removal and Installation - Rear Quarter Panel Moulding
Special Tool(s) / General Equipment
| Interior Trim Remover |
Removal
NOTE: Removal steps in this procedure may contain installation details.
NOTE: LH side shown, RH side similar.
-
Remove the pushpins.
.jpg) |
-
Remove the retainer clips and moulding.
Use the General Equipment: Interior Trim Remover
.jpg) |
-
Remove the retainer clips and moulding.
Use the General Equipment: Interior Trim Remover
.jpg) |
Installation
-
To install, reverse the removal procedure.
 Removal and Installation - Rear Door Upper Moulding
Removal
NOTE:
Removal steps in this procedure may contain installation details.
NOTE:
LH side shown, RH side similar.
Remove the upper belt moulding screw at front of the door...
 Removal and Installation - Rear Spoiler
Special Tool(s) /
General Equipment
Interior Trim Remover
Removal
NOTE:
Removal steps in this procedure may contain installation details...
Other information:
Ford Explorer 2020-2026 Service Manual: Removal and Installation - Cabin Heater Coolant Temperature Sensor
Special Tool(s) / General Equipment Hose Clamp(s) Removal NOTE: Removal steps in this procedure may contain installation details. Disconnect the electrical connector. Remove the locking clip and remove the cabin heater coolant temperature sensor...
Ford Explorer 2020-2026 Service Manual: Specifications
Lubricants, Fluids, Sealers and Adhesives Item Specification Transfer case fluid Material: Motorcraft® MERCON® LV Automatic Transmission Fluid / XT-10-QLVC (WSS-M2C938-A) (MERCON® LV, ) Capacities Liters Transfer case - Service fill 1...
Categories
- Manuals Home
- 6th Generation Explorer Owners Manual
- 6th Generation Explorer Service Manual
- General Procedures - Rear Camber Adjustment
- Automatic Transmission - 10-Speed Automatic Transmission – 10R60
- Fuel Filler Funnel Location & Running Out of Fuel
- New on site
- Most important about car
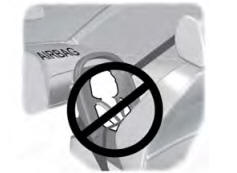
Children and Airbags
WARNING: Airbags can kill or injure a child in a child restraint. Never place a rear-facing child restraint in front of an active airbag. If you must use a forward-facing child restraint in the front seat, move the seat upon which the child restraint is installed all the way back.

Copyright © 2026 www.foexplorer.com