Ford Explorer: Body Closures / General Procedures - Hood Alignment
Ford Explorer 2020-2026 Service Manual / Body and Paint / Body and Paint / Body Closures / General Procedures - Hood Alignment
Adjustment
NOTE: Removal steps in this procedure may contain installation details.
All alignments
-
Remove the hood latch.
Refer to: Hood Latch (501-14 Handles, Locks, Latches and Entry Systems, Removal and Installation).
-
Remove the nuts and the striker assembly.
Torque: 80 lb.in (9 Nm)
.jpg) |
Hood fore and aft, left and right alignments
-
Loosen the nuts to permit movement of the hood.
Loosen:
: 2 turn(s)
.jpg) |
-
Carefully close the hood.
.jpg) |
-
Adjust the hood as required.
.jpg) |
-
Carefully open the hood.
.jpg) |
-
Tighten the nuts.
Torque: 159 lb.in (18 Nm)
.jpg) |
Hood front up and down alignments
-
Adjust the bump stop rubbers.
.jpg) |
-
Adjust the hood as required.
.jpg) |
All alignments
-
Install the striker assembly.
Torque: 80 lb.in (9 Nm)
.jpg) |
-
Loosen the nuts to permit movement of the striker assembly.
Loosen:
: 2 turn(s)
.jpg) |
-
Tighten the nuts.
Torque: 80 lb.in (9 Nm)
.jpg) |
-
Inspect the body-to-hood alignment.
.jpg) |
-
Install the removed components.
 General Procedures - Front Door Alignment
Adjustment
NOTE:
Removal steps in this procedure may contain installation details.
NOTE:
LH side shown, RH side similar.
All alignments
Open the door...
 General Procedures - Liftgate Alignment
Special Tool(s) /
General Equipment
Interior Trim Remover
Materials
Name
Specification
Seam SealerTA-2-B, 3M™ 08308, LORD Fusor® 805DTM
-
Adjustment
NOTE:
Remova..
Other information:
Ford Explorer 2020-2026 Service Manual: Diagnosis and Testing - Communications Network
Diagnostic Trouble Code (DTC) Chart Diagnostics in this manual assume a certain skill level and knowledge of Ford-specific diagnostic practices. REFER to: Diagnostic Methods (100-00 General Information, Description and Operation). Diagnostic Trouble Code Chart Module DTC Description Action GWM U2100:0..
Ford Explorer 2020-2026 Service Manual: Diagnosis and Testing - Daytime Running Lamps (DRL)
Diagnostic Trouble Code (DTC) Chart Diagnostics in this manual assume a certain skill level and knowledge of Ford-specific diagnostic practices. REFER to: Diagnostic Methods (100-00 General Information, Description and Operation). Diagnostic Trouble Code Chart Module DTC Description Action BCM B124A:1..
Categories
- Manuals Home
- 6th Generation Explorer Owners Manual
- 6th Generation Explorer Service Manual
- Removal and Installation - Front Halfshaft Speed Sensor
- Electric Parking Brake
- Description and Operation - Jacking and Lifting - Overview
- New on site
- Most important about car
Child Safety Locks
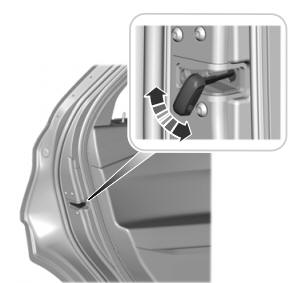
When these locks are set, you cannot open the rear doors from the inside.

A child safety lock is on the rear edge of each rear door. You must set the child safety lock separately on each door.
Left-Hand Side
Copyright © 2026 www.foexplorer.com
