Ford Explorer: Exterior Trim and Ornamentation / Removal and Installation - Roof Moulding
Ford Explorer 2020-2026 Service Manual / Body and Paint / Body and Paint / Exterior Trim and Ornamentation / Removal and Installation - Roof Moulding
Removal
NOTE: Removal steps in this procedure may contain installation details.
NOTE: LH side shown, RH side similar.
-
Lower the headliner.
Refer to: Headliner - Lowering (501-05 Interior Trim and Ornamentation, Removal and Installation).
-
Remove the nuts.
Torque: 53 lb.in (6 Nm)
.jpg) |
-
Remove the roof moulding.
.jpg) |
-
Remove the roof moulding clip.
Torque: 42 lb.in (4.8 Nm)
.jpg) |
Installation
NOTE: Wipe the surface with rubbing Alcohol to clear any adhesive.
NOTE: Make sure that a new component is installed.
-
Install the roof moulding clip.
Torque: 42 lb.in (4.8 Nm)
.jpg) |
-
Install the roof moulding.
.jpg) |
-
Tighten in sequence shown.
Torque: 53 lb.in (6 Nm)
.jpg) |
-
Install the headliner.
Refer to: Headliner - Lowering (501-05 Interior Trim and Ornamentation, Removal and Installation).
-
To install, reverse the removal procedure.
 Removal and Installation - Rocker Panel Moulding
Removal
NOTE:
Removal steps in this procedure may contain installation details.
NOTE:
LH side shown, RH side similar.
Using a non-marring trim tool disengage the W-clip fastener..
 Removal and Installation - Roof Rail
Removal
NOTE:
Removal steps in this procedure may contain installation details.
NOTE:
LH side shown, RH side similar.
Lower the headliner...
Other information:
Ford Explorer 2020-2026 Service Manual: Description and Operation - Evaporative Emissions - Overview
O..
Ford Explorer 2020-2026 Service Manual: Removal and Installation - Exhaust Gas Recirculation (EGR) Back Pressure Sensor
Removal NOTE: Removal steps in this procedure may contain installation details. Remove the air cleaner outlet pipe. Refer to: Air Cleaner Outlet Pipe (303-12A Intake Air Distribution and Filtering - 2.3L EcoBoost (201kW/273PS), Removal and Installation)...
Categories
- Manuals Home
- 6th Generation Explorer Owners Manual
- 6th Generation Explorer Service Manual
- Description and Operation - Identification Codes
- Automatic Transmission - 10-Speed Automatic Transmission – 10R60
- Using Tether Straps
- New on site
- Most important about car
Locking and Unlocking
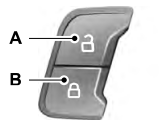
You can use the power door lock control or the remote control to lock and unlock your vehicle.
Power Door Locks
The power door lock control is on the driver and front passenger door panels.

Copyright © 2026 www.foexplorer.com
