
Ford Explorer: Exterior Lighting / Removal and Installation - Rear Lamp Assembly
Ford Explorer 2020-2026 Service Manual / Electrical / Lighting / Exterior Lighting / Removal and Installation - Rear Lamp Assembly
Special Tool(s) / General Equipment
| Interior Trim Remover |
Removal
NOTE: Removal steps in this procedure may contain installation details.
NOTE: LH lamp assembly shown, RH lamp assembly is similar.
-
Remove the loadspace trim panel.
Refer to: Loadspace Trim Panel (501-05 Interior Trim and Ornamentation, Removal and Installation).
-
Using a non-marring tool, remove the rear lamp assembly side trim cover.
Use the General Equipment: Interior Trim Remover
.jpg) |
-
Remove the screw.
Torque: 22 lb.in (2.5 Nm)
.jpg) |
-
Disconnect the rear lamp assembly electrical connector.
.jpg) |
-
Position the rear lamp assembly.
-
Using a non-marring tool, release the rear lamp assembly retainer pin outward.
Use the General Equipment: Interior Trim Remover
-
Gently pull the rear lamp assembly away from the vehicle.
-
Using a non-marring tool, release the rear lamp assembly retainer pin outward.
.jpg) |
-
Detach the rubber grommet and remove the rear lamp assembly.
.jpg) |
Installation
-
To install, reverse the removal procedure.
 Removal and Installation - Light Sensor
Special Tool(s) /
General Equipment
Interior Trim Remover
Removal
NOTE:
Removal steps in this procedure may contain installation details...
 Removal and Installation - Rear Lamp Bulb
Special Tool(s) /
General Equipment
Interior Trim Remover
Removal
NOTE:
Removal steps in this procedure may contain installation details...
Other information:
Ford Explorer 2020-2026 Service Manual: General Procedures - Lead Terminal Repair
Materials Name Specification Motorcraft® Ultra-Clear Spray Glass CleanerZC-23 ESR-M14P5-A Repair Bring the vehicle up to at least the specified room temperature or above. NOTE: The new terminal covers the original terminal location, but it must be placed so the terminal conductive areas will be placed on a good conductive base...
Ford Explorer 2020-2026 Service Manual: Removal and Installation - Radiator
Removal NOTE: Removal steps in this procedure may contain installation details. Remove the cooling module. Refer to: Cooling Module (303-03A Engine Cooling - 2.3L EcoBoost (201kW/273PS), Removal and Installation). Remove the bolt, release the tabs and remove the A/C condenser...
Categories
- Manuals Home
- 6th Generation Explorer Owners Manual
- 6th Generation Explorer Service Manual
- General Procedures - Rear Camber Adjustment
- Removal and Installation - Front Halfshaft Speed Sensor
- Interior Trim and Ornamentation
- New on site
- Most important about car
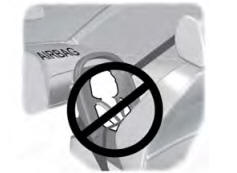
Children and Airbags
WARNING: Airbags can kill or injure a child in a child restraint. Never place a rear-facing child restraint in front of an active airbag. If you must use a forward-facing child restraint in the front seat, move the seat upon which the child restraint is installed all the way back.

Copyright © 2026 www.foexplorer.com