
Ford Explorer: Engine - 2.3L EcoBoost (201kW/273PS) / Removal and Installation - Crankshaft Rear Seal
Ford Explorer 2020-2026 Service Manual / Powertrain / Engine / Engine - 2.3L EcoBoost (201kW/273PS) / Removal and Installation - Crankshaft Rear Seal
Special Tool(s) / General Equipment
.jpg) |
303-328
(T88P-6701-B1)
Replacer, Rear Seal TKIT-1988-FLM TKIT-1988-F TKIT-1988-LM |
| Oil Drain Equipment | |
Materials
| Name | Specification |
|---|---|
| Motorcraft® High Performance Engine RTV Silicone TA-357 |
WSE-M4G323-A6 |
Removal
-
Remove the flexplate.
Refer to: Flexplate (303-01A Engine - 2.3L EcoBoost (201kW/273PS), Removal and Installation).
-
-
Remove the bolts and the crankshaft rear seal.
-
Discard the crankshaft rear seal.
-
Remove the bolts and the crankshaft rear seal.
.jpg) |
-
Clean and prepare the RTV sealing surface.
Refer to: RTV Sealing Surface Cleaning and Preparation (303-00 Engine System - General Information, General Procedures).
.jpg) |
Installation
-
NOTE: If the crankshaft rear seal is not secured within 10 minutes of sealant application, the sealant must be removed and the sealing area cleaned. Failure to follow this procedure can cause future oil leakage.
Apply a 4 mm (0.157 in) bead of silicone to the oil pan surface and a 5 mm (0.196 in) bead at the T-joints.
Material: Motorcraft® High Performance Engine RTV Silicone / TA-357 (WSE-M4G323-A6)
.jpg) |
-
-
Install the crankshaft rear main oil seal installer.
Use Special Service Tool: 303-328 (T88P-6701-B1) Replacer, Rear Seal.
-
Install the crankshaft rear seal retainer at an
angle above the oil pan flange to avoid scraping off the sealer.
-
Tilt the seal retainer up and onto the rear of the cylinder block.
-
Install the crankshaft rear main oil seal installer.
.jpg) |
-
Using the special tool, seat the crankshaft rear seal.
Use Special Service Tool: 303-328 (T88P-6701-B1) Replacer, Rear Seal.
.jpg) |
-
Install the bolts and tighten in sequence shown.
Remove Special Service Tool: 303-328 (T88P-6701-B1) Replacer, Rear Seal.
Torque: 97 lb.in (11 Nm)
.jpg) |
-
-
Remove the oil pan drain bolt and drain the engine oil.
Use the General Equipment: Oil Drain Equipment
-
Install the oil pan drain bolt.
Torque: 20 lb.ft (27 Nm)
-
Remove the oil pan drain bolt and drain the engine oil.
.jpg) |
-
Remove and discard the engine oil filter.
Use the General Equipment: Oil Drain Equipment
.jpg) |
-
Lubricate the oil filter seal with clean engine oil and install.
Torque:
Stage 1: 71 lb.in (8 Nm)
Stage 2: 180°
.jpg) |
-
Install the flexplate.
Refer to: Flexplate (303-01A Engine - 2.3L EcoBoost (201kW/273PS), Removal and Installation).
-
Fill the engine with clean engine oil.
Refer to: Specifications (303-01A Engine - 2.3L EcoBoost (201kW/273PS), Specifications).
.jpg) |
 Removal and Installation - Crankshaft Pulley
Special Tool(s) /
General Equipment
303-1521Alignment Tool, Crankshaft Position SensorTKIT-2010C-FLM
303-1686Holding Tool, Camshaft
303-1689Holding Tool, Crank Damper
303-5..
 Removal and Installation - Cylinder Head
Special Tool(s) /
General Equipment
Oil Drain Equipment
Hose Clamp Remover/Installer
Materials
Name
Specification
Motorcraft® High Performance Engine RTV SiliconeTA-357
WSE-M4..
Other information:
Ford Explorer 2020-2026 Owners Manual: Obstacle Detection
Note: Entering your vehicle while the liftgate is closing can cause your vehicle to bounce and activate obstacle detection. To prevent this, let the power liftgate close completely before you enter your vehicle. Before driving off, check the instrument cluster for a liftgate or door ajar message or warning indicator...
Ford Explorer 2020-2026 Owners Manual: Motorcraft Parts - 3.0L
1 If a Motorcraft oil filter is not available, use an oil filter that meets industry performance specification SAE/USCAR-36. 2 See your authorized dealer for correct replacement. 3 For spark plug replacement, contact an authorized dealer. Replace the spark plugs at the appropriate intervals...
Categories
- Manuals Home
- 6th Generation Explorer Owners Manual
- 6th Generation Explorer Service Manual
- Auxiliary Power Points
- General Service Information
- Traction Control
- New on site
- Most important about car
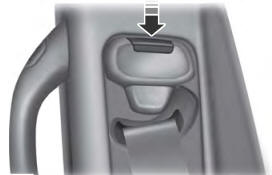
Seatbelt Height Adjustment
WARNING: Position the seatbelt height adjuster so that the seatbelt rests across the middle of your shoulder. Failure to adjust the seatbelt correctly could reduce its effectiveness and increase the risk of injury in a crash.

Copyright © 2026 www.foexplorer.com