Ford Explorer: Front Suspension - RWD / Removal and Installation - Wheel Knuckle
Special Tool(s) / General Equipment
.jpg) |
204-592 Separator, Lower Arm Ball Joint TKIT-2006C-FFMFLM TKIT-2006C-LM TKIT-2006C-ROW |
Removal
NOTICE: Suspension fasteners are critical parts that affect performance of vital components and systems. Failure of these fasteners may result in major service expense. Use the same or equivalent parts if replacement is necessary. Do not use a replacement part of lesser quality or substitute design. Tighten fasteners as specified.
-
Remove the wheel and tire.
Refer to: Wheel and Tire (204-04A Wheels and Tires, Removal and Installation).
-
-
Remove the bolt and position aside the wheel speed sensor harness.
-
Remove the brake hose bracket bolt and position aside the brake hose.
-
Remove the bolt and position aside the wheel speed sensor harness.
.jpg) |
-
NOTICE: Do not use power tools to remove or install the lower arm outboard nut. Damage to the ball joint or ball joint seal may occur.
NOTE: Use the TORX PLUS® holding feature to prevent the ball stud from turning while removing or installing the lower arm outboard nut. Torx® and TORX PLUS® is a reg. tm of Acument Intellectual Properties, LLC.
Remove and discard the front lower arm outboard nut.
.jpg) |
-
NOTICE: Do not use a hammer, prying device, or separator fork to separate the ball joint from the wheel knuckle. Damage to the ball joint or ball joint seal may occur.
NOTICE: Use care when releasing the lower arm and wheel knuckle into the resting position. Damage to the ball joint or ball joint seal may occur.
Separate the front lower arm from the wheel Knuckle.
Use Special Service Tool: 204-592 Separator, Lower Arm Ball Joint.
.jpg) |
-
NOTE: If equipped.
-
Disconnect the ride height sensor electrical connector.
-
Remove the ride height sensor arm anchor plate bolt.
-
Disconnect the ride height sensor electrical connector.
.jpg) |
-
NOTICE: Do not use power tools to remove or install the lower arm outboard nut. Damage to the ball joint or ball joint seal may occur.
NOTE: Use the TORX PLUS® holding feature to prevent the ball stud from turning while removing or installing the lower arm outboard nut. Torx® and TORX PLUS® is a reg. tm of Acument Intellectual Properties, LLC.
Remove and discard the rear lower arm outboard nut.
.jpg) |
-
NOTICE: Do not use a hammer, prying device, or separator fork to separate the lower arm from the ball joint. Damage to the ball joint or ball joint seal may occur.
NOTICE: Use care when releasing the lower arm and wheel knuckle into the resting position. Damage to the ball joint or ball joint seal may occur.
Separate the rear lower arm from the wheel Knuckle.
Use Special Service Tool: 204-592 Separator, Lower Arm Ball Joint.
.jpg) |
-
Remove the wheel bearing and wheel hub.
Refer to: Front Wheel Bearing and Wheel Hub (204-01A Front Suspension - RWD, Removal and Installation).
-
NOTICE: Do not use a hammer to separate the tie rod end from the wheel knuckle or damage to the wheel knuckle may result.
NOTICE: Use care when installing the tie rod separator or damage to the tie rod end boot may occur.
NOTE: Use the hex-holding feature to prevent turning of the stud while removing the tie rod end nut.
-
Remove and discard the tie rod end nut.
-
Separate the tie rod end from the wheel knuckle.
-
Remove and discard the tie rod end nut.
.jpg) |
-
If necessary, Remove the brake disc shield retainers and the brake disc shield.
.jpg) |
-
-
Remove and discard the lower strut-to-wheel knuckle bolts and nuts.
-
Remove the wheel knuckle.
-
Remove and discard the lower strut-to-wheel knuckle bolts and nuts.
.jpg) |
Installation
-
-
Position the wheel knuckle to the lower strut assembly.
-
Install the new lower strut-to-wheel knuckle bolts and nuts.
Torque: 166 lb.ft (225 Nm)
-
Position the wheel knuckle to the lower strut assembly.
.jpg) |
-
If removed, Install the brake disc shield and the brake disc shield retainers.
Torque: 80 lb.in (9 Nm)
.jpg) |
-
NOTICE: Use care when installing the tie rod separator or damage to the tie rod end boot may occur.
NOTE: Use the hex-holding feature to prevent turning of the stud while removing the tie rod end nut.
-
Attach the tie rod end to the wheel knuckle.
-
Install the new tie rod end nut.
Torque: 52 lb.ft (70 Nm)
-
Attach the tie rod end to the wheel knuckle.
.jpg) |
-
Install the wheel bearing and wheel hub.
Refer to: Front Wheel Bearing and Wheel Hub (204-01A Front Suspension - RWD, Removal and Installation).
-
NOTE: Make sure that the mating lower arm faces are clean and free of foreign material.
Before installing lower arm, inspect the rear lower arm housing to make sure the cavity is clean and free of foreign material.
.jpg) |
-
NOTICE: Do not use power tools to remove or install the lower arm outboard nut. Damage to the ball joint or ball joint seal may occur.
NOTE: Use the TORX PLUS® holding feature to prevent the ball stud from turning while removing or installing the lower arm outboard nut. Torx® and TORX PLUS® is a reg. tm of Acument Intellectual Properties, LLC.
-
Attach the rear lower arm to the wheel knuckle.
-
Install the new rear lower arm outboard nut.
Torque:
Type-1, Police and HEV (hybrid electric vehicle), M16 for Heavy Duty: 173 lb.ft (235 Nm)
Type-2, GAS vehicles, M14 for Standard Duty: 85 lb.ft (115 Nm)
-
Attach the rear lower arm to the wheel knuckle.
.jpg) |
-
NOTE: If equipped.
-
Install the front ride height sensor arm anchor plate bolt.
Torque: 97 lb.in (11 Nm)
-
Connect the ride height sensor electrical connector.
-
Install the front ride height sensor arm anchor plate bolt.
.jpg) |
-
NOTE: Make sure that the mating wheel knuckle faces is clean and free of foreign material.
Before installing a new front lower arm, inspect the knuckle to make sure the cavity is clean and free of foreign material.
.jpg) |
-
NOTICE: Do not use power tools to remove or install the lower arm outboard nut. Damage to the ball joint or ball joint seal may occur.
NOTE: Use the TORX PLUS® holding feature to prevent the ball stud from turning while removing or installing the lower arm outboard nut. Torx® and TORX PLUS® is a reg. tm of Acument Intellectual Properties, LLC.
-
Attach the front lower arm to the wheel knuckle.
-
Install the new front lower arm outboard nut.
Torque: 76 lb.ft (103 Nm)
-
Attach the front lower arm to the wheel knuckle.
.jpg) |
-
-
Position the brake hose and install the brake hose bracket bolt.
Torque: 133 lb.in (15 Nm)
-
Position the wheel speed sensor harness and install the bolt.
Torque: 106 lb.in (12 Nm)
-
Position the brake hose and install the brake hose bracket bolt.
.jpg) |
-
Install the wheel and tire.
Refer to: Wheel and Tire (204-04A Wheels and Tires, Removal and Installation).
-
Check and if necessary adjust front toe.
Refer to: Front Toe Adjustment (204-00 Suspension System - General Information, General Procedures).
-
NOTE: If equipped.
Calibrate the suspension height sensor. Connect the scan tool and carry out the Ride Height Calibration routine. Follow the scan tool directions.
 Removal and Installation - Rear Lower Arm Ball Joint
Special Tool(s) /
General Equipment
204-358Remover/Installer, Ball JointTKIT-2005P-FTKIT-2005P-ROW
204-592Separator, Lower Arm Ball JointTKIT-2006C-FFMFLMTKIT-2006C-LMTKIT-2006C-ROW
..
 Removal and Installation - Wheel Studs
Special Tool(s) /
General Equipment
Hydraulic Press
Removal
NOTICE:
Suspension fasteners are critical parts that affect
performance of vital components and systems...
Other information:
Ford Explorer 2020-2026 Owners Manual: SPECIAL NOTICES
New Vehicle Limited Warranty Vehicles sold in the United States and Canada For a detailed description of what is covered by your New Vehicle Limited Warranty, see your warranty guide that is available online. For more information, refer to our website and download your copy of the warranty guide...
Ford Explorer 2020-2026 Service Manual: Removal and Installation - Second Row Seat Cushion Blower Motor
Removal NOTE: Removal steps in this procedure may contain installation details. Remove the second row single seat cushion cover. Refer to: Second Row Single Seat Cushion Cover - Vehicles With: Second Row Captain Chairs (501-10B Second Row Seats, Removal and Installation)...
Categories
- Manuals Home
- 6th Generation Explorer Owners Manual
- 6th Generation Explorer Service Manual
- Description and Operation - Jacking and Lifting - Overview
- General Procedures - Rear Camber Adjustment
- Body and Paint
- New on site
- Most important about car
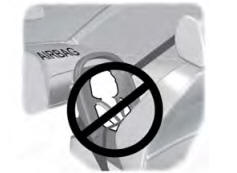
Children and Airbags
WARNING: Airbags can kill or injure a child in a child restraint. Never place a rear-facing child restraint in front of an active airbag. If you must use a forward-facing child restraint in the front seat, move the seat upon which the child restraint is installed all the way back.