Ford Explorer: Front Suspension - RWD / Removal and Installation - Front Lower Arm
Special Tool(s) / General Equipment
.jpg) |
204-592 Separator, Lower Arm Ball Joint TKIT-2006C-FFMFLM TKIT-2006C-LM TKIT-2006C-ROW |
| Vehicle/Axle Stands | |
Removal
NOTICE: Suspension fasteners are critical parts that affect the performance of vital components and systems. Failure of these fasteners may result in major service expense. Use the same or equivalent parts if replacement is necessary. Do not use a replacement part of lesser quality or substitute design. Tighten fasteners as specified.
-
Measure the distance from the center of the hub to the
lip of the fender with the vehicle in a level, static ground position
(curb height).
.jpg) |
-
Remove the wheel and tire.
Refer to: Wheel and Tire (204-04A Wheels and Tires, Removal and Installation).
-
NOTICE: Do not use power tools to remove or install the lower arm outboard nut. Damage to the ball joint or ball joint seal may occur.
NOTE: Use the TORX PLUS® holding feature to prevent the ball stud from turning while removing or installing the lower arm outboard nut. Torx® and TORX PLUS® is a reg. tm of Acument Intellectual Properties, LLC.
Remove and discard the front lower arm outboard nut.
.jpg) |
-
NOTICE: Do not use a hammer, prying device, or separator fork to separate the ball joint from the wheel knuckle. Damage to the ball joint or ball joint seal may occur.
NOTICE: Use care when releasing the lower arm and wheel knuckle into the resting position. Damage to the ball joint or ball joint seal may occur.
Separate the front lower arm from the wheel Knuckle.
Use Special Service Tool: 204-592 Separator, Lower Arm Ball Joint.
.jpg) |
-
Remove and discard the front lower arm-to-frame bolt and remove the front lower arm.
.jpg) |
Installation
NOTICE: Tighten the suspension fasteners with the weight of the vehicle on the wheels and tires or use a suitable jack to raise the suspension to curb height or damage to the bushings may occur.
-
NOTE: Make sure that the mating wheel knuckle face is clean and free of foreign material.
Before installing a new front lower arm, inspect the knuckle to make sure it is clean and free of foreign material.
.jpg) |
-
NOTE: Only tighten the nuts and bolts finger tight at this stage.
Position the front lower arm and install the new front lower arm-to-frame bolt.
.jpg) |
-
NOTICE: Do not use power tools to remove or install the lower arm outboard nut. Damage to the ball joint or ball joint seal may occur.
NOTE: Use the TORX PLUS® holding feature to prevent the ball stud from turning while removing or installing the lower arm outboard nut. Torx® and TORX PLUS® is a reg. tm of Acument Intellectual Properties, LLC.
-
Attach the front lower arm to the wheel knuckle.
-
Install the new front lower arm outboard nut.
Torque: 76 lb.ft (103 Nm)
-
Attach the front lower arm to the wheel knuckle.
.jpg) |
-
Use a suitable jack to raise the suspension until the
distance between the center of the hub and the lip of the fender is
equal to the measurement taken during removal (curb height).
Use the General Equipment: Vehicle/Axle Stands
.jpg) |
-
NOTICE: Tighten the suspension fasteners with the weight of the vehicle on the wheels and tires or use a suitable jack to raise the suspension to curb height or damage to the bushings may occur.
NOTE: Only tighten the nuts and bolts when the suspension is in the normal drive position.
Tighten the front lower arm-to-frame bolt and nut.
Torque: 221 lb.ft (300 Nm)
.jpg) |
-
Install the wheel and tire.
Refer to: Wheel and Tire (204-04A Wheels and Tires, Removal and Installation).
-
Check and if necessary adjust front toe.
Refer to: Front Toe Adjustment (204-00 Suspension System - General Information, General Procedures).
 Removal and Installation - Front Stabilizer Bar
Removal
NOTICE:
Suspension fasteners are critical parts that affect the
performance of vital components and systems. Failure of these fasteners
may result in major service expense...
Other information:
Ford Explorer 2020-2026 Service Manual: Description and Operation - Noise, Vibration and Harshness (NVH)
Acceptable Noise, Vibration and Harshness (NVH) Noise is any undesirable sound, usually unpleasant in nature. Vibration is any motion, shaking or trembling, that can be felt or seen when an object moves back and forth or up and down. Harshness is a ride quality issue where the vehicle's response to the road transmits sharply to the customer...
Ford Explorer 2020-2026 Service Manual: Removal and Installation - Transmission Park Manual Release Cable
Removal NOTE: Removal steps in this procedure may contain installation details. With the vehicle in N, position it on a hoist. Refer to: Jacking and Lifting - Overview (100-02 Jacking and Lifting, Description and Operation). Remove the transmission park manual release cable bracket bolt...
Categories
- Manuals Home
- 6th Generation Explorer Owners Manual
- 6th Generation Explorer Service Manual
- General Procedures - Transmission Fluid Drain and Refill
- Description and Operation - Jacking and Lifting - Overview
- Body and Paint
- New on site
- Most important about car
Locking and Unlocking
You can use the power door lock control or the remote control to lock and unlock your vehicle.
Power Door Locks
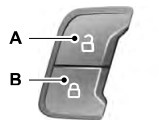
The power door lock control is on the driver and front passenger door panels.


