Ford Explorer: High Voltage Battery, Mounting and Cables / Removal and Installation - Battery Energy Control Module (BECM) - Hybrid Electric Vehicle (HEV)
Special Tool(s) / General Equipment
| Ford Diagnostic Equipment |
Removal
.jpg) WARNING:
To prevent the risk of high-voltage shock, always follow
precisely all warnings and service instructions, including instructions
to depower the system. The high-voltage system utilizes approximately
450 volts DC, provided through high-voltage cables to its components and
modules. The high-voltage cables and wiring are identified by orange
harness tape or orange wire covering. All high-voltage components are
marked with high-voltage warning labels with a high-voltage symbol.
Failure to follow these instructions may result in serious personal
injury or death.
WARNING:
To prevent the risk of high-voltage shock, always follow
precisely all warnings and service instructions, including instructions
to depower the system. The high-voltage system utilizes approximately
450 volts DC, provided through high-voltage cables to its components and
modules. The high-voltage cables and wiring are identified by orange
harness tape or orange wire covering. All high-voltage components are
marked with high-voltage warning labels with a high-voltage symbol.
Failure to follow these instructions may result in serious personal
injury or death.
-
Refer to: High Voltage System Health and Safety Precautions - Overview (100-00 General Information, Description and Operation)..jpg) WARNING:
Before beginning any service procedure in this
section, refer to Safety Warnings in section 100-00 General Information.
Failure to follow this instruction may result in serious personal
injury.
WARNING:
Before beginning any service procedure in this
section, refer to Safety Warnings in section 100-00 General Information.
Failure to follow this instruction may result in serious personal
injury.
-
NOTE: This step is only necessary when installing a new component.
NOTE: Use the previous FDRS vehicle session or start a session manually by entering the VIN.
Download the BECM information to the diagnostic tool using the Programmable Modules Installation routine.
Refer to: Module Programming (418-01 Module Configuration, General Procedures).
Use the General Equipment: Ford Diagnostic Equipment
-
Remove the high voltage battery.
Refer to: High Voltage Battery - Hybrid Electric Vehicle (HEV) (414-03 High Voltage Battery, Mounting and Cables, Removal and Installation).
-
Remove the fasteners and the high voltage battery cover.
.jpg) |
-
Disconnect the electrical connectors.
.jpg) |
-
Disconnect the electrical connectors in the sequence shown.
.jpg) |
-
NOTE: Disconnect the 5th electrical connector and wait 10 seconds.
Disconnect the electrical connector.
.jpg) |
-
Disconnect the electrical connectors in the sequence shown.
.jpg) |
-
Remove the nuts and the BECM.
Torque: 80 lb.in (9 Nm)
.jpg) |
Installation
-
Install the BECM and the nuts.
Torque: 80 lb.in (9 Nm)
.jpg) |
-
Connect the electrical connectors in the sequence shown.
.jpg) |
-
Connect the electrical connectors.
.jpg) |
-
The fasteners must be installed by hand before final tightening.
Tighten the fasteners in sequence shown in 2 stages.
Torque:
Stage 1: 62 lb.in (7 Nm)
Stage 2: 177 lb.in (20 Nm)
.jpg) |
-
Install the high voltage battery.
Refer to: High Voltage Battery - Hybrid Electric Vehicle (HEV) (414-03 High Voltage Battery, Mounting and Cables, Removal and Installation).
-
NOTE: This step is only necessary when installing a new component.
Upload the BECM information from the diagnostic tool using the Programmable Modules Installation routine.
Refer to: Module Programming (418-01 Module Configuration, General Procedures).
 Removal and Installation - High Voltage Battery Cables - Hybrid Electric Vehicle (HEV)
Removal
WARNING:
To prevent the risk of high-voltage shock, always follow
precisely all warnings and service instructions, including instructions
to depower the system...
 Removal and Installation - High Voltage Battery Junction Box - Hybrid Electric Vehicle (HEV)
Removal
WARNING:
To prevent the risk of high-voltage shock, always follow
precisely all warnings and service instructions, including instructions
to depower the system...
Other information:
Ford Explorer 2020-2024 Service Manual: Description and Operation - Supplemental Climate Control - Component Location
..
Ford Explorer 2020-2024 Owners Manual: Rear Under Floor Storage (If Equipped)
Cargo Management System (If Equipped) The system is in the floor of the cargo area. Lift the handle to open. Adjustable Load Floor (If Equipped) Vehicles with the standard size spare tire can adjust the load floor to two positions. You can place the front of the load floor either on, for high position, or below, for low position, the ledges behind the rear seats...
Categories
- Manuals Home
- 6th Generation Explorer Owners Manual
- 6th Generation Explorer Service Manual
- Traction Control
- General Procedures - Transmission Fluid Drain and Refill
- Body and Paint
- New on site
- Most important about car
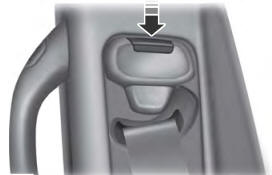
Seatbelt Height Adjustment
WARNING: Position the seatbelt height adjuster so that the seatbelt rests across the middle of your shoulder. Failure to adjust the seatbelt correctly could reduce its effectiveness and increase the risk of injury in a crash.

